ML 101 - How LLMs Generate Text

Β· 12 min read

Understanding LLMs Using Kitchen Analogy​

Imagine you're running a high-end restaurant, where every dish served is an AI-generated response.

  • The chef represents the AI model (LLM).
  • The ingredients are the tokens (words, subwords).
  • The recipe book represents the model's training data.
  • The cooking process is the text generation pipeline.

Let's go step by step and see how the kitchen (LLM) operates.

1. Tokenization = Preparing Ingredients​

Before cooking begins, a chef prepares ingredients by cutting vegetables, and measuring spices needed for a dish. LLMs follow a similar processβ€”they break down text into smaller units called tokens.

Example:

  • Input sentence:
    "We're revolutionizing grocery shopping."
  • Chopping process: Breaking it into ingredients (tokens):
    ["We're", "revolutionizing", "grocery", "shopping"]
  • Each token gets a numeric ID, like labeling ingredients with barcodes for inventory.

πŸ‘‰ Just like a chef doesn't use whole vegetables but cuts them into usable pieces, LLMs split text into tokens for efficient processing.

2. Logits & Softmax = Deciding the Next Ingredient Based on Taste​

A chef doesn't just throw in random spices β€” they taste the dish and decide which ingredient will make it better. Similarly, LLMs predict the most likely next token.

  • The chef has a list of possible next ingredients (logits) ranked by suitability.
  • They smell, taste, and evaluate (Softmax) to choose the best one.

Example: The chef considers:

  • Salt (low probability) – Might overpower the dish.
  • Garlic (medium probability) – Could add depth.
  • Basil (high probability) – Complements the dish well.

After sampling (Softmax), the chef selects Basil because it enhances the dish.

πŸ‘‰ Just as a chef refines flavors with seasoning, LLMs select the next word based on learned probabilities.

3. Autoregressive Generation = Cooking Step-by-Step​

A chef doesn't prepare a dish by mixing everything at once. Instead, they add ingredients in a specific order, letting each step build upon the last.

  • The chef starts with a base (prompt):

    "We're revolutionizing grocery shopping."
  • Follow a structured cooking process, adding one ingredient at a time:

    1. Add "with" β†’ Stir well.
      • Current dish: "We're revolutionizing grocery shopping with"
    2. Add "same-day" β†’ Let it cook.
      • Current dish: "We're revolutionizing grocery shopping with same-day"
    3. Add "delivery" β†’ Adjust seasoning.
      • Current dish: "We're revolutionizing grocery shopping with same-day delivery"
    4. Add "powered by AI" β†’ Final plating.
      • Current dish: "We're revolutionizing grocery shopping with same-day delivery powered by AI"
  • The dish is complete when a special stop signal appears (like the [EOS] token in AI).

4. Transformer Architecture​

A well-organized kitchen doesn't rely on a single chef doing everything. Instead, it follows a highly efficient workflow, where different kitchen staff members specialize in different tasks. This is exactly how the Transformer model worksβ€”processing information in parallel rather than sequentially.

4.1 Self-Attention = A Waiter Managing Multiple Tables at Once​

A great waiter doesn't just focus on one table at a time. Instead, they keep track of all their tables, making sure each one gets the right service at the right time. Similarly, self-attention allows an LLM to analyze all words in a sentence at once, rather than just looking at the last word.

Example: Suppose a waiter is serving multiple tables:

  • Table 1 orders an appetizer.
  • Table 2 asks for a drink refill.
  • Table 3 needs the check.

Instead of serving one table at a time, a skilled waiter manages all tables simultaneously, prioritizing based on urgency.

πŸ‘‰ Self-attention ensures the model doesn't just focus on the last word but considers the entire sentence at once.


4.2 Positional Encoding = The Right Order of Courses​

In a restaurant, a meal has a specific orderβ€”you wouldn't serve dessert before the main course. Similarly, LLMs use positional encoding to keep track of word order, ensuring that sentences are structured correctly.

Correct order:

  1. Serve the appetizer.
  2. Bring the main course.
  3. Deliver dessert.

Wrong order:

  1. Deliver dessert first.
  2. Bring the main course.
  3. Serve the appetizer.

Even though the same dishes are served, the experience is completely wrong if the order is mixed up. Similarly, an AI model ensures the correct sentence structure by encoding word positions.


4.3 Feedforward Layers = Final Presentation​

Before a dish is served to the customer, it goes through a final quality checkβ€”the chef ensures the presentation is perfect, adds final garnishes, and makes sure the seasoning is balanced. Similarly, feedforward layers refine token embeddings, making sure the model's predictions are polished and well-formed.

Example: A chef checks a dish before serving:

  • Too bland? β†’ Add a final sprinkle of seasoning.
  • Messy plating? β†’ Rearrange for better presentation.
  • Overcooked steak? β†’ Adjust for future orders.

This last step ensures the final dish meets high standards. Similarly, a Transformer's feedforward layers refine the model's predictions before finalizing the output.


Technical Explanation​

Picture this: You're at a startup demo day in the Bay Area. A founder steps onstage and says: "We're revolutionizing grocery shopping."

An AI assistant predicts the next phrase: "…with same-day delivery powered by AI."

How does the AI come up with this? LLMs generate text by tokenizing input, predicting the next token using probabilities derived from logits, and iteratively building sentences using the Transformer architecture. In summary, the process involves:

  1. Tokenize the prompt:
    • Input: "We're revolutionizing grocery shopping."
    • Tokens: ["We're", "revolutionizing", "grocery", "shopping"]
  2. Add positional encodings:
    • Each token is embedded with positional information to retain word order.
    • Output: [101, 202, 303, 404]
  3. Pass through Transformer layers:
    • The embeddings undergo self-attention and feedforward transformations, enabling the model to understand the context and relationships between tokens.
  4. Get logits and apply Softmax:
    • The model calculates logits for the next token, e.g.,
      • Logits: [1.2, 2.8, 0.9, 3.0, …]
      • Softmax: [0.05, 0.15, 0.02, 0.20, …]
    • The token with the highest probability is selected: "with."
  5. Generate final output:
    • The model predicts tokens one by one: "with" β†’ "same-day" β†’ "delivery" β†’ "powered" β†’ "by AI."

Above steps in detail:

1. Tokenization: Splitting Text into Pieces​

LLMs like GPT don't process raw text directly. Instead, they split the text into smaller units called tokens. These tokens can be whole words, parts of words, or even individual characters, depending on the model's tokenizer.

  • Original text: "We're revolutionizing grocery shopping."
  • Tokens: ["We're", "revolutionizing", "grocery", "shopping."]

Next, each token is assigned a numeric ID to enable mathematical processing by the model:

  • Token IDs: [101, 202, 303, 404]

These IDs correspond to entries in the model's vocabulary, a giant list of all the tokens it has learned during training.

2. Logits & Softmax: Turning Scores into Probabilities​

Once the tokens are processed, the model predicts the next token by calculating logits. Logits are raw scores indicating how likely each token in the vocabulary (which is a list of all the tokens the model has learned during training, could be 100,000+ tokens) is to be the next word.

For example, if the model has a vocabulary of 100,000 tokens, it might output scores like:

  • Logits: [1.2, 2.8, 0.9, 3.0, …]

These raw scores aren't directly interpretable as probabilities. To convert them, the model uses Softmax, a mathematical function that normalizes these logits so they sum to 1.

After applying Softmax, the scores might look like this:

  • Softmax: [0.05, 0.15, 0.02, 0.20, …]

These probabilities represent the likelihood of each token i.e. "with", "same-day", "delivery", "powered", "by AI" being the next one in the sequence.

3. Autoregressive Generation: Building the Sentence​

Once the model has calculated the logits and applied Softmax, it predicts the next token based on the context of previous tokens.

  1. Start with the prompt:
    "We're revolutionizing grocery shopping."
  2. Predict the next token:
    The model evaluates all possible tokens and predicts the most likely next token: "with."
  3. Update the sequence:
    The prompt becomes: "We're revolutionizing grocery shopping with."
  4. Repeat the process:
    • The model predicts: "same-day", appending it to the sequence
      • "We're revolutionizing grocery shopping with same-day."
    • Then: "delivery", appending it to the sequence
      • "We're revolutionizing grocery shopping with same-day delivery."
    • Then: "powered", appending it to the sequence
      • "We're revolutionizing grocery shopping with same-day delivery powered."
    • Finally: "by AI.", appending it to the sequence
      • "We're revolutionizing grocery shopping with same-day delivery powered by AI."
  5. End the sequence:
    The model stops generating when it predicts a special end-of-sequence token ( [EOS]).

3.1 How EOS is Predicted?​

Most language models are trained with a vocabulary that includes a special token, typically called [EOS] (End of Sequence), which signals the completion of the text. Here's how it works:

During training, the model learns to predict [EOS] in contexts where text logically ends. For example, if the training data contains sentences like:

  • "This is a complete sentence." [EOS]
  • "Another example of a sentence." [EOS]

The model is trained to associate [EOS] with the point where text typically stops. This makes [EOS] part of its vocabulary, just like any other token.

At each step of generation, [EOS] is one of the potential tokens the model can select. When the probability of [EOS] becomes the highest (or is sampled probabilistically), the model stops generating further tokens.

Example: After generating the phrase: "We're revolutionizing grocery shopping with same-day delivery powered by AI", the model:

  1. Calculates probabilities for all possible next tokens, including [EOS]
  2. If [EOS] has the highest probability, the sequence ends

4. Transformer Architecture: The Engine Behind the Scenes​

The Transformer architecture is the foundation of large language models. It uses several key mechanisms to process and generate text. Here's how it works with data examples:

4.1 Self-Attention: Understanding Context​

Self-attention allows the model to determine which tokens in the input are most important for understanding a given token.

How It Works:
Each token generates three vectors:

  • Query (Q): What this token wants to know
  • Key (K): How relevant each other token is
  • Value (V): The actual content of each token

Think of attention scores like a student ("grocery") asking questions to their classmates. The student's question is the Query, and each classmate has their own expertise (Key) to offer. The attention score shows how relevant each classmate's knowledge is to the student's question.

The attention score is calculated by comparing how well the question (Query) matches with each classmate's expertise (Key), similar to how well students' study interests align. Just like in a classroom, we normalize these scores so the student divides their attention (100%) among their classmates.

Example:
For the sentence "We're revolutionizing grocery shopping,":

When processing "grocery", the model asks: "Who should I pay attention to?" It looks at each word and calculates how relevant they are:

Attention Scores (before normalization):

  • "We're" β†’ 0.1 (Not very relevant)
  • "revolutionizing" β†’ 0.4 (Somewhat relevant)
  • "shopping" β†’ 0.8 (Highly relevant)

Softmax Normalization:
Just like a student can't give 200% attention, we normalize these scores to probabilities:

  • "We're" β†’ 0.08 (8% attention)
  • "revolutionizing" β†’ 0.25 (25% attention)
  • "shopping" β†’ 0.67 (67% attention)

The token "grocery" focuses most of its attention on "shopping" because they're naturally related in this context, just like how a student might pay more attention to a classmate discussing the same topic.

4.2 Positional Encoding: Keeping Word Order Intact​

Think of positional encoding like giving each student a numbered badge to wear. Even if all students arrive at once, their badges tell us their correct order in line. Each student wears both their regular nametag (token embedding) and this numbered badge (positional encoding), so we always know both who they are and where they belong in line.

Example:
For the sentence "We're revolutionizing grocery shopping,":

Token embeddings (like student nametags showing their identity):

  • "We're" β†’ [0.12, 0.45, 0.78] (their unique identity vector)
  • "revolutionizing" β†’ [0.34, 0.67, 0.11] (their unique identity vector)
  • "grocery" β†’ [0.56, 0.89, 0.32] (their unique identity vector)
  • "shopping" β†’ [0.23, 0.44, 0.91] (their unique identity vector)

Positional encodings (like numbered badges showing position in line):

  • Position 1 β†’ [0.01, 0.02, 0.03] (first position encoding)
  • Position 2 β†’ [0.02, 0.03, 0.04] (second position encoding)
  • Position 3 β†’ [0.03, 0.04, 0.05] (third position encoding)
  • Position 4 β†’ [0.04, 0.05, 0.06] (fourth position encoding)

Token embeddings with positional encoding (students wearing both nametag and badge):

  • "We're" β†’ [0.13, 0.47, 0.81] (identity + first position)
  • "revolutionizing" β†’ [0.36, 0.70, 0.15] (identity + second position)
  • "grocery" β†’ [0.59, 0.93, 0.37] (identity + third position)
  • "shopping" β†’ [0.27, 0.49, 0.97] (identity + fourth position)

This ensures the model knows both what each token means and its position in the sequence. e.g. "We're" comes before "revolutionizing" and so on or "grocery" comes before "shopping".

4.3 Feedforward Layers: Refining Predictions​

Think of feedforward layers like a student revising their notes after a class discussion. Each revision helps the student better understand how their topic connects to the overall lesson. The initial notes get refined through multiple passes, each making the understanding clearer and more complete.

Example:
Token embedding for "revolutionizing" (after attention and positional encoding):

Input embedding: [0.36, 0.70, 0.15] (initial understanding)

The feedforward neural network applies transformations:

  1. Linear Layer 1: Multiplies by a weight matrix and adds a bias (first revision)
  2. Activation Function: Applies non-linearity (ReLU) (highlighting key points)
  3. Linear Layer 2: Refines the representation further (final polish)

Output embedding: [0.42, 0.85, 0.28] (refined understanding)

This embedding now captures more abstract features, like how "revolutionizing" fits into the broader context of the sentence.

Bringing It All Together​

For the input: "We're revolutionizing grocery shopping with..."

  1. Self-Attention:
    The model determines that "grocery" relates strongly to "shopping" and "revolutionizing" relates to "We're".

  2. Positional Encoding:
    The model knows the sequence of words, ensuring it doesn't mix up "grocery shopping" with "shopping grocery".

  3. Feedforward Layers:
    Each token's embedding is refined, enabling the model to predict the next token.

Using these mechanisms, the model generates the continuation: "We're revolutionizing grocery shopping with same-day delivery powered by AI."

ML 101 - Data Grounding and RAG

Β· 5 min read

Data Grounding​

Prompt: "What is the battery capacity of the latest Tesla Model 3?"

  • Without Data Grounding: A model trained only up to 2023 might say:
    "The Tesla Model 3 has a battery capacity of up to 75 kWh."
    This could be outdated if the model has changed.
  • With Data Grounding Using RAG: The model checks Tesla's latest data:
    "The 2025 Tesla Model 3 has a battery capacity of up to 82 kWh."

Imagine an elderly librarian (our LLM) who is incredibly knowledgeable but hasn't left the library in years. While they know an enormous amount, their knowledge is frozen in time. Data grounding is like giving him a smartphone with internet access.
Now, instead of relying solely on their memory, they can provide up-to-date information by checking reliable external sources.

Ways to ground a model:

  • RAG: Combining retrieval with generation for real-time accuracy.
  • Prompt Engineering: Crafting prompts that embed necessary context or examples.
  • Fine-Tuning: Updating the model's weights with domain-specific data.

Retrieval-Augmented Generation (RAG)​

Imagine you're searching for a specific book in a huge library. You know the library has all sorts of information you need, but flipping through every single page or shelf would be time-consuming. Instead, you use catalogs and indexes to find the relevant books quickly. Once you have those books in hand, you summarize or combine their content to answer your question.

That, in a nutshell, is RAG:

  1. Retrieve the relevant data (like pulling the right books off the shelf).
  2. Generate an answer (like creating a summary from those books).

Why RAG?​

LLMs are powerful, but they come with major constraints:

  1. Limited Knowledge Window till their last training data.
  2. Bias from Training Data
  3. Context Hallucinations as they generate text based on probabilities of what word should come next, they sometimes hallucinate.

RAG addresses these limitations by letting your LLM "look up" new or private data (like going to that library) without retraining the entire model from scratch. This is especially important for enterprises that have a lot of proprietary information.

RAG Architecture​

RAG typically involves two main steps:

  1. Retrieval: This is where you "search the library." A retrieval component (often a semantic search engine) scans the external data sources to find relevant chunks of text.
  2. Generation: After the relevant texts are retrieved, the LLM "reads" them and generates the final answer, ideally grounded in those retrieved facts.

RAG Example​

  1. User Query: "What are the key market trends for wearable devices in 2025?"
  2. Index Search: The system checks an index (like a library catalog) built from corporate research documents on wearable devices.
  3. Retrieve Documents: Relevant research papers, whitepapers, or internal reports are found. Let's say 3–5 documents are deemed most relevant.
  4. LLM Generation: The LLM then processes these 3–5 documents and crafts a synthesized response. Instead of relying on its "old" training data, it now grounds its answer in these up-to-date, private documents.

Precision and Recall​

LLMs are verbose by default β€” design your system to maximize recall upstream, and enforce precision downstream through reranking, validation, or filters.

StageFocusExplanation
πŸ” RetrieverHigh Recallβ€œFind anything that might help.”
🧠 LLM + RerankerHigh Precisionβ€œNow pick only the most relevant and trustworthy.”

Imagine you're a detective investigating a crime. You have a list of suspects and you need to find the one who committed the crime.

MetricWhat it MeansProsCons
High PrecisionMost predicted positives are correctAccurate predictions, low false alarmsMight miss actual positives (low recall)
Low PrecisionMany predicted positives are wrongMight catch all actual positives (if recall is high)Many false alarms
High RecallMost actual positives are foundRarely misses important positivesMight include irrelevant or wrong positives (low precision)
Low RecallMany actual positives are missedVery selective predictionsMisses important positive cases

Common Use CaseOptimize ForWhy?
Intent Detection (chatbots)High Precision,
Low Recall
Wrong intents lead to confusing replies. Better to admit uncertainty than be wrong.
Information Retrieval (RAG)Moderate Precision,
High Recall
Gather all potentially relevant context. LLM can handle noise via reranking.
Question AnsweringHigh Precision,
Recall Ignore
Trust relies on correctness. Better to say β€œI don’t know” than hallucinate.
SummarizationHigh Precision,
Recall Ignore
Summary must reflect source truthfully. Don’t invent info.
Code GenerationHigh Precision,
Recall Ignore
Invalid code breaks functionality. Avoid hallucinated or broken output.

Coding - Union Find

Β· 7 min read

Imagine you’re organizing a large function where members of different families gather. Your task is to assign table numbers to families while ensuring:

  1. Each family gets a unique table number.
  2. You can quickly determine if two people belong to the same family.
  3. You can efficiently merge tables if two families need to sit together.

Similarly, consider a network of computers. Each computer can communicate with others if they are connected directly or indirectly. How many cables will you need to connect all computers or check if adding one creates a cycle? You solve these problems by Union-Find algorithm.

It is a powerful tool for solving problems involving:

  • Connected Components: Counting isolated groups in a network.
  • Dynamic Connectivity: Determining if two nodes are connected dynamically.
  • Cycle Detection: Checking if adding an edge creates a cycle in a graph.

"Families and Leaders"​

Think of Union-Find as Managing Families:

  1. Each family has a leader (or root) who represents the entire family.
  2. Every family member knows who their leader is, directly or indirectly.
    1. Find Operation: If you ask a family member who their leader is, they will:
      1. Point to the leader directly.
      2. If unsure, point to someone else in the family who knows the leader. You keep following the chain until you find the leader.
  3. Union Operation: When two families want to merge:
    1. Find the leaders of both families.
    2. Make one leader subordinate to the other, effectively merging the families under one leader.

Optimizations - How to Run Union and Find Faster?​

  1. Path Compression:

    • When someone finds their leader, they remember it for future queries. This reduces the time needed for subsequent operations and ensures all members directly point to the leader.
  2. Rank Optimization:

    • When merging families, always attach the smaller family under the larger family. This way, the structure will be balanced. It minimizes the chain length, preventing any single path from growing disproportionately long.

Code Walkthrough​

Imagine you have 6 people, each initially in their own family. Using the union operation, you start connecting people into larger families:

  • Step 1: Person 0 and Person 1 become a family.
  • Step 2: Person 2 and Person 3 form their own family.
  • Step 3: The families of (0, 1) and (2, 3) merge into one big family.

Finding Family Leaders: When asked, "Who is the head of Person 3’s family?" the find operation quickly identifies Person 0 as the overall leader, avoiding unnecessary checks of the hierarchy.

Counting Total Families: By the end, you use the countComponents operation to determine there are 3 unique families left:

  • Family 1: (0, 1, 2, 3)
  • Family 2: (4)
  • Family 3: (5)
// Create a UnionFind instance for 6 nodes (0 to 5)
const uf = new UnionFind(6);

// Initial state of the data structure
// parent = [0, 1, 2, 3, 4, 5] (each node is its own leader)
// rank = [0, 0, 0, 0, 0, 0] (all nodes have rank 0)

// Start connecting family members
// Step 1: Union(0, 1) - Connect node 0 and 1
uf.union(0, 1);
// parent = [0, 0, 2, 3, 4, 5] (1's leader is now 0)
// rank = [1, 0, 0, 0, 0, 0] (0's rank increased to 1)

// Step 2: Union(2, 3) - Connect node 2 and 3
uf.union(2, 3);
// parent = [0, 0, 2, 2, 4, 5] (3's leader is now 2)
// rank = [1, 0, 1, 0, 0, 0] (2's rank increased to 1)

// Step 3: Union(1, 2) - Connect the groups of node 1 and node 2
uf.union(1, 2);
// parent = [0, 0, 0, 2, 4, 5] (2's leader is now 0, path compression applied)
// rank = [2, 0, 1, 0, 0, 0] (0's rank increased to 2)

// Step 4: Find(3) - Find the leader of node 3
const leader3 = uf.find(3);
// parent = [0, 0, 0, 0, 4, 5] (path compression: 3 points directly to leader 0)
// leader3 = 0

// Step 5: Count components - Count the unique groups
const numComponents = uf.countComponents();
// unique leaders = [0, 4, 5]
// numComponents = 3

So there are 3 unique families left.

Data Structure Implementation​

class UnionFind {
constructor(size) {
// Step 1: Initialize the parent and rank arrays
this.parent = Array.from({ length: size }, (_, i) => i); // Each person is their own leader initially
this.rank = Array(size).fill(0); // All ranks start at 0
}

// Step 2: Find the leader (root) of a node
find(node) {
if (this.parent[node] !== node) {
// Path compression: Make every node on the path point directly to the leader
this.parent[node] = this.find(this.parent[node]);
}
return this.parent[node];
}

// Step 3: Union two nodes (merge their groups)
union(node1, node2) {
const root1 = this.find(node1); // Find leader of node1
const root2 = this.find(node2); // Find leader of node2

if (root1 !== root2) {
// Union by rank: Attach the smaller tree under the larger tree
if (this.rank[root1] > this.rank[root2]) {
this.parent[root2] = root1; // root1 becomes the leader
} else if (this.rank[root1] < this.rank[root2]) {
this.parent[root1] = root2; // root2 becomes the leader
} else {
// If ranks are equal, pick one as leader and increase its rank
this.parent[root2] = root1;
this.rank[root1]++;
}
}
}

// Step 4: Count the number of unique groups
countComponents() {
const uniqueLeaders = new Set();
for (let i = 0; i < this.parent.length; i++) {
uniqueLeaders.add(this.find(i)); // Find the leader of each node
}
return uniqueLeaders.size;
}
}

When to Update Rank During Union?​

Rank represents an upper bound on the height of a tree. It is a heuristic used to minimize the height of the trees, which directly improves the efficiency of the find operation. The rank is incremented only under specific conditions to ensure the optimization remains effective.

Key Rule: The rank is updated only when two groups (trees) of equal rank are merged. In this case:

  • The height of the resulting tree increases by one.
  • The rank of the new leader is incremented to reflect this change.

Rank is NOT Updated If One Tree's Rank is Greater:

  • The smaller tree is attached under the larger tree.
  • Since the larger tree’s height does not change, the rank remains the same.

Examples: Connecting a Network​

You are given n computers and a list of connections where connections[i] = [a, b] represents a cable between computer a and computer b.
Determine the minimum number of operations to connect all computers, or return -1 if it’s not possible.

  1. Check Feasibility: If connections.length < n - 1, return -1 (not enough cables).
  2. Union-Find to Connect Computers: Use the union operation to group computers.
  3. Count Connected Components: Use the countComponents method to determine the number of groups.
  4. Calculate Minimum Operations: If there are x groups, you need x - 1 extra cables.
    1. If you have 2 groups, you need 1 cable to connect them.
    2. If you have 3 groups, you need 2 cables to connect them.
    3. In general, to connect x groups, you need x - 1 cables.
function makeConnected(n, connections) {
if (connections.length < n - 1) return -1; // Not enough cables

const uf = new UnionFind(n);
for (const [a, b] of connections) {
uf.union(a, b);
}

const x = uf.countComponents();
return x - 1; // Extra cables needed
}

// Example Usage
const n = 6;
const connections = [
[0, 1], [0, 2], [0, 3], [1, 4], [3, 5]
];
console.log(makeConnected(n, connections)); // Output: 1

DS - Terraform and Kubernetes

Β· 6 min read

Imagine you're managing a smart city with two major aspects:

  1. Building and setting up the city: Constructing buildings, setting up roads, and laying utilities.
    1. Terraform: The city planner and builder focuses on designing and building the infrastructure of the city (e.g., deploying houses, roads, parks, and utilities).
    2. Once built, its job is mostly done until you want to expand or modify the city.
  2. Managing day-to-day operations: Deciding how residents (applications) move around, scaling services based on population, and ensuring things run smoothly.
    1. Kubernetes: The city manager and traffic controller focuses on managing the daily operations of the city. It ensures:
      1. People (applications) have the resources they need (e.g., water, electricity).
      2. Traffic (requests) is routed efficiently between locations.
      3. The city adapts dynamically (e.g., scaling services during peak hours or moving people if one area becomes overcrowded).

Terraform: The City Planner and Builder​

Imagine you're building and managing a smart city (your cloud infrastructure). This city has buildings (servers), roads (networks), utilities (databases), and parks (other resources).

To manage this city efficiently:

  • You don’t build each building or road by hand.
  • Instead, you use blueprints that describe what needs to be built, where, and how it connects.

Terraform is the architect and planner that creates and applies these blueprints:

Blueprints (Code)​

You write a blueprint using Terraform’s special language (HCL – HashiCorp Configuration Language) to describe your city’s infrastructure. For example:

  • β€œBuild 10 houses (servers).”
  • β€œCreate a road (network) to connect them.”
  • β€œAdd a park (database) for public use.”

Execution (Building)​

Terraform takes the blueprint and talks to builders (cloud providers like AWS, Google Cloud, Azure) to construct the city as planned.

State Management​

Terraform keeps a map of your city (state file). If you make changes to the blueprint, Terraform checks what’s already there and only updates the parts that need to change.

Example: If you add 2 more houses in the blueprint, Terraform builds just those without demolishing the existing ones.

Kubernetes: City Manager​

Kubernetes is like the city’s management system that oversees the daily operations of your smart city. It ensures that every resident (application) gets what they need, resources are allocated efficiently, and the city scales dynamically based on the population.

Key Components​

1. Containers: Residents in Apartments (contains application code)​

  • Containers are the individual residents living in the apartments (pods). They come with their furniture, and supplies (code and dependencies) packed and ready to use.
    • Containers are lightweight, portable, and self-contained.
    • Multiple residents (containers) can share an apartment (pod)
    • If a resident moves out or a new one moves in, the city manager (Kubernetes) handles it seamlessly.

2. Pods: Apartments in Buildings (contains containers)​

  • Pods are like apartments in your city’s buildings. Each pod houses one or more residents (containers) who live together and share resources like utilities (e.g., internet, electricity).
    • Apartments (pods) are the basic units of accommodation (deployment).
    • Each apartment has its own address (IP address).
    • It can house a single tenant (container) or a group of roommates (multiple containers working together).

3. Nodes: Buildings in the City (contains pods)​

  • Nodes are the physical or virtual buildings in your smart city. Each building provides space for apartments (pods).
    • The building (node) hosts multiple apartments (pods).
    • Buildings are managed by the city authority (Kubernetes).
    • If a building gets overcrowded or faces issues, the K9S ensures residents are relocated.

4. Clusters: The Entire City (contains nodes)​

  • A cluster is the whole city made up of multiple buildings (nodes). It’s managed by a central city authority (Kubernetes master node) that oversees everything.
    • The city (cluster) is made of several buildings (nodes).
    • Each building communicates with the central city authority using a messenger (kubelet).
    • The authority ensures everything in the city works efficiently, from assigning new apartments (pods) to managing city-wide resources.

5. Namespace: Districts in the City (contains clusters)​

  • A Namespace is like a district in your smart city. Each district organizes and isolates different parts of the city while sharing the same overall infrastructure.
    • Each district (namespace) has its own set of buildings (nodes), apartments (pods), and utilities (resources).
    • The city authority (Kubernetes) ensures that districts stay separate and operate efficiently within the larger city.

Why Use Namespaces?

  • Organization: Separate different environments (e.g., development, testing, production) or teams within the same city (cluster).
  • Resource Management: Control and allocate resources (CPU, memory, storage) per district to prevent one from overusing shared resources.

Imagine a city with three districts:

  1. Development District: Where new building designs (apps) are tested.
  2. Testing District: Where you simulate real-world conditions for buildings (apps).
  3. Production District: Where finished buildings (apps) are fully operational for public use.

Each district has its own set of apartments (pods), residents (containers), and policies.

Other Components: Helm, Service Mesh, Vault​

Helm Addon: The City’s Logistics Coordinator​

In a smart city, organizing large deliveries to the city’s residents (applications) requires efficient logistics. Helm is the logistics coordinator who handles:

  • Delivering packages (applications) to apartments (pods) i.e. how to fetch correct application artifacts and deploy them to a pod accurately.
    • Allowing you to easily plan complex deliveries with detailed manifests.
  • Done via Helm Charts: they are like pre-packaged delivery plans with instructions on what packages to deliver, where, and how.

Service Mesh Addon: The City’s Transport Network​

A Service Mesh is like having a city-wide transport control system that manages how buildings (microservices) talk to each other. Instead of each building figuring things out on its own, the service mesh handles:

  • Traffic Routing 🚦 β†’ Directs requests to the right service instance.
  • Security (authentication) πŸ”’ β†’ Ensures secure communication between services.
  • Observability (rate limiting) β†’ Tracks service-to-service interactions.
  • Resilience πŸ—οΈ β†’ Retries failed requests and handles errors gracefully.

It does all this without requiring changes to the services themselves.

A service mesh works by using sidecar proxies πŸš—.

  • Each service has a "sidecar" proxy (like a personal driver for every building)
  • These proxies handle all network communication on behalf of the service.
  • The service itself only talks to its local proxy, and the proxies talk to each other.

Think of it as each building in the city having its own smart traffic assistant that follows the city's global rules.

Example: A popular service mesh tool is Istio, which uses Envoy as its sidecar proxy.

Vault Addon: The City’s Secure Vault​

Every smart city needs a secure location to store valuable items like keys, documents, and credentials. The Vault addon is the city’s secure vault that:

  • Stores sensitive information securely.
  • Manages access to these secrets.
  • Automatically rotates keys to ensure security.
The Staff Engineer

Β· 6 min read

A Staff Engineer's impact comes from more than just their own work. They sit at the intersection of technical strategy, cross-functional collaboration, and mentorship.

  • Mentoring other engineers to think more strategically
    • Drive architecture discussions to cultivate strategic thinking
      • Use a design document template to cover basics with questions like: Feasibility (Resource availability, Technical complexity, Time to market), Scalability, Schedule and Risk Assessment
      • Guide the conversation, but allow engineers to arrive at decisions themselves.
      • Share real-world examples of when you made strategic mistakes and what you learned
  • Creating processes that raise the bar for the entire org
  • Building tools that multiply team effectiveness
    • AI tooling for code generation, refactoring, test coverage analysis, duplicate code detection, sequence diagram generation from code
  • Tooling for code quality like ESLint for code styles
  • Setting technical direction that helps others align their work with long-term goals by publishing technical vision documents that outline 1-2 year goals

Leadership: How do you lead your team?​

  • Provide technical expertise to cross functional team and your peers
  • Having influence on roadmap (future and current projects) and on your peers
    • roadmap
      • potential / future looking projects
        • Have a good understanding of your own product
        • What's new in the market? (competitors)
        • How do you come up with new product ideas?
          • Look into other industry (military, biotech) for ideas and inspiration
      • current roadmap - architecture decision
        • Build your own opinion
          • Have a deep understanding of what customers need now? by gaining insight internally and externally.
          • figure out what's possible in certain timeline?
        • Communicate to others via architecture discussion meetings
          • Actively listen to other's work and voice your opinions
          • Use a design document template as a reference point to ensure everything is covered.
          • Scalability, Schedule, and Risk Assessment
    • on your peers
      • knowledge transfer of skills
        • Keep an environment they are always learning
        • Teach skills on how to solve a problem without giving them a solution. e.g.
          • Troubleshooting skills and RCA docs
            • Brainstorm on multiple hypothesis that could be causing problem and honing on your fundamentals
            • Validate your hypothesis to find root cause
          • How to break down a feature into small incremental delivery?
      • doing the hard work and gaining trust
      • developing your junior's career path
        • communicate clearly the problem, expectation from the solution
        • being a helping hand to peer

3 Role Pillars​

A Staff Engineer makes significant impact by thinking big-picture, executing messy and ambiguous project, and leveling up skills of everyone around you.

0. Solid Technical Knowledge (Baseline)​

You need to have a strong fundamental technical knowledge i.e. your review comments should be well thought out and right. They should make design better. But this is not alone, you need to

  • Act like a leader by breaking down problem and seeking help from your peers to solve or delegate
  • Communicate a problem so that other people care about it
  • Decide which problems should you spend your energy on vs. delegate to others

1. Big-Picture Thinking​

A staff engineer's job is to see the bigger picture β€” beyond what's convenient for one team.

Imagine a team picking "Software A" because it's quick to set up, but it ends up creating headaches for security, and IT down the line. "Software B" might take a bit more effort upfront, but it saves everyone time and frustration in the long run.

A staff engineer steps in to spot these trade-offs, think ahead, and make sure decisions work for the whole company, not just one corner of it.


You do this by building local context β€” understanding what the team needs, what other teams care about, and how decisions play out over time.

It's about balancing today's needs with what'll keep things running smoothly in the future.

Engineering leadership involves making the design move from good to better. The gap between good and better isn't always obvious - a good solution solve today's problem, but a better solution does that while making tomorrow's problems easier to solve.

It means looking at bigger picture by thinking beyond current time, initiating long-term projects and designing for change.

a. Beyond Current Time​

You're constantly wrestling with future-facing questions:

  • How will this service handle 5x the load?
  • Which technical decisions today will become tomorrow's constraints?

b. Initiating Long-Term Projects​

You start projects nobody asked forβ€”yet. It's about recognizing when quick fixes aren't enough and having the courage to propose year-long initiatives, like:

  • Modernizing deployment pipelines before they become a bottleneck
  • Building internal tools that will save hundreds of engineering hours
  • Paving path to move away from a dying technology

c. Designing for Change​

You design systems with their entire lifecycle in mind β€” from inception to eventual retirement:

  • Making architectural choices that allow for graceful scaling
  • Creating documentation that helps future teams understand not just how, but why

Amazon Leadership Principles

Β· 8 min read

1. Customer Obsession​

  • Amazon's goal is to leave a legacy: Becoming Earth's most customer-centric company (listen, invent, personalize).
    • "What we have always wanted to do is raise the standard for what it means to be customer-centric to such a degree that other organizations should look at Amazon as a role model and ask, 'How can we be as customer-centric as Amazon?'"
    • Sony early mission was not to make Sony known for quality, but to make "Japan" known for quality.
  • What we focus on: Thinking long-term, putting the customer at the center, and inventing for customer - all together.
    • "If you're going to invent, you need to experiment, and if you're going to experiment, you need to accept failure. If you are going to fail, you need to think long-term."
    • "You can't invent on the behalf of the customer if you're not thinking long-term. Because a lot of inventions does not work."
  • How we do it:
    • Start with the customer and work backwards. Instead of starting with the technology/product and work forwards
    • Prioritize customer satisfaction over profit! If you delight your customers you will make a profit eventually.
tip
  • Ask, β€œIs what I’m working on helping my customer?” Remove non-value steps?
  • Honestly pursue customer feedback, not just solicit for compliments?
  • Anticipate and know your customer's needs (needed immediately) and wants (needed eventually)?
  • Leaders are owners. They think long term and don't sacrifice long-term value for short-term results. They act on behalf of the entire company.
  • They never say "that's not my job". Leaders champion ideas they believe will benefit the business.
    • "Be an owner, not investor. Investor only care about short term success, while owner want long term sustainable business."
  • Leaders expect and require innovation from their teams and always find ways to simplify.
    • Think about killing bad products and simplifying products, not just "inventing".
  • Be externally aware and look for new ideas from everywhere. Don't be limited by "not invented here".

4. Leaders Are Right a Lot​

  • Good leaders have strong judgment and good instincts.
    • "It sounds simple, but there is a way to practice being right a lot. You won't always be right, but you can improve."
  • People who are right a lot -
    • They listen a lot, seek diverse perspectives.
    • They change their minds a lot, often based on new data or reanalyzing a situation.
      • Think about how you disagreed with someone, consulted the data or reanalyzed the situation, and came up with the right answer.
      • or when you used your judgement to make a call when you have limited data to support or you re-evaluated the situation.
    • They try to disconfirm their own beliefs.
  • "Politicians struggle with this because the moment they change their mind, they are accused of flip-flopping. But in reality, anyone who never changes their mind is underestimating the complexity of the world."

5. Frugality​

  • Accomplish more with less.
  • Constraints breed resourcefulness, self-sufficiency, and invention.
  • The two-pizza teams principle: No team should be too large that it cannot be fed with two pizzas.
    • "We humans evolved around campfires, telling each other stories. A team of 10-12 people is the perfect size for natural coordination without too much structure."
  • Using six-page memos instead of PowerPoint for better communication.

6. Hire and Develop the Best​

  • Raise the performance bar with every hire and promotion.
  • Recognize exceptional talent and move them throughout the organization.
  • Develop leaders and take seriously the role of coaching others.

7. Earn Trust​

  • Listen attentively, speak candidly, and treat others respectfully.
  • Be vocally self-critical, even when awkward or embarrassing.
  • Benchmark yourself and your team against the best.
  • "What do you do as a leader to stay in touch with a 19-year-old in his bedroom, revolutionizing an industry? You hire smart people."

8. Insist on the Highest Standards​

  • Maintain relentlessly high standards, even if they seem unreasonably high.
    • "People might think our standards are too high, but they help us build great products and services. It's fun to work in future."
  • Defects do not get sent down the line; problems are fixed so they stay fixed.
  • When you are giving a great customer experience, the only way to do it is with happy people. You can't do it with unhappy people.
    • "Work-life balance? I prefer to call it work-life harmony. When I'm happy at work, I come home a better dad. When I'm happy at home, I come to work a better leader."
    • "Amazon is constantly changing and if you hate change, job in high-tech would be challenging."

9. Bias for Action: Be Bold, Take Risks, and Be Scrappy​

  • A few big successes can compensate for dozens of failures.
    • "I have made billions of dollars of failures at Amazon β€” literally billions. But bold bets like AWS, Kindle, and Prime have more than made up for them."
  • Speed matters in business.
  • Many decisions and actions are reversible and do not need extensive study.
  • Amazon values calculated risk-taking.
    • "One of my jobs as Amazon's leader is to encourage bold bets. The problem is people love to focus on things that aren't working, which can be helpful, but you must also celebrate experimentation."

11. Have Backbone – Disagree and Commit​

  • Respectfully challenge decisions when you disagree, even when uncomfortable or exhausting.
  • Have conviction and be tenacious.
  • Do not compromise for the sake of social cohesion.
    • "You must be willing to challenge decisions. But once the decision is made, commit to it."

13. Think Big​

  • Thinking small is a self-fulfilling prophecy.
  • Create and communicate a bold direction that inspires results.
  • Think differently and look around corners for ways to serve customers.

14. Deliver Results​

tip
  • Achieve the right result instead of driving goal for the sake of goal achievement. Take a hit on goal attainment to achieve the right result.
    • Right result is what's good for customer in the long run?
    • It is a trade-off between schedule and providing better customer experience. Always focus on later.
  • Set smart team goals, expectations and priorities for the team.
warning
  • Trying to get everything done, without regard for importance.
  • Working at an unsustainable pace and expecting others to do the same.
  • Build for the sake of building, without regard for customer needs.
  • Creating a false sense of success or false confidence.
  • Focus on the controllable inputs of your businss and deliver them with the right quality and in a timely manner.
    • "You might think I spend my time managing Amazon's stock price, but that would be a mistake. The best approach is to focus on inputs that create long-term value."
    • Output of the company: stock price.
    • Controllable Inputs to higher stock price: Number of customers served, features available to them.
      • You change that by customer obsession, invention, and operational excellence (reduce defects).
        • Reduce defects β†’ Better customer experience β†’ More customers β†’ Higher stock price
        • Innovation β†’ More margin β†’ Lower prices β†’ More customers β†’ Higher stock price
        • Customer obsession β†’ Higher engagement β†’ Higher lifetime value β†’ Higher stock price
  • Get the important things done and have the team focused and motivated in order to deliver the right results.
    • Important things: Required for customer right now.
    • Team focus: Set smart team goals and expectations.
    • Motivate team: Share successes.
  • Help remove obstacles and enabling team to achieve more than they thought possible.

Assorted: A. Why Lower Prices Make Sense?​

  • When you lower prices, you increase the number of customers, the revenue, and the profit.
    • "People assume you should always optimize for percentage margins, but actually, you should optimize for dollar margins. That's why lowering prices makes sense."
  • You can't have both best experience and lowest prices in physical retail as the fixed costs increases with more stores.
    • "In online business, you can have best experience and lowest prices."
Percentage Margins vs Dollar Margins

Imagine you own a fruit shop.

  • Premium apples sell for β‚Ή100 with a 50% profit margin (β‚Ή50 profit per apple).
  • Regular apples sell for β‚Ή20 with a 25% profit margin (β‚Ή5 profit per apple).

If you only focus on percentage margin, premium apples seem better.

But if you drop the price of premium apples to β‚Ή80, more people buy them. Now:

  • Your profit margin drops to 40% (β‚Ή32 per apple).
  • However, you sell 5 times more apples, increasing your total profit.

Even though the percentage margin is lower, your total earnings (dollar margin) are much higher because of increased sales volume.

This is why businesses often lower prices strategicallyβ€”to maximize total profit.

SD - Cache

Β· 3 min read

Types of Caches​

1. Cache-Aside (Lazy Loading)​

Read: (Update cache on miss)
User -> Read -> Cache
-> (Cache Miss) -> Database
-> Store in Cache -> Return Data

Write:
User -> Write to Database
-> (Optional) Invalidate Cache

At any point:
Database = 100 records
Cache = Only hot/active 10 records
  • Cache is populated lazily on read misses
  • Cache holds only frequently accessed items

Pro: Saves memory; ideal for read-heavy systems
Con: Cache can become stale if not properly invalidated after database updates.

Use Case: Product catalog in e-commerce. Read heavy. Not all products required to be cached

tip

Cache-aside
App will check the fridge. If it's empty, app will go get groceries and fill it.

Read-through
App will ask the cache. If cache is empty, cache will go get groceries and fill it.

2. Write-Through Cache​

Read:
User -> Read -> Cache
-> Return Data

Write: (Both write synchronous)
User -> Write -> Cache
-> Write to Database

At any point:
Database = 100 records
Cache = Full mirror of 100 records
  • Cache and DB always in sync. Cache is updated on every write.

Pro: Guarantees data consistency between cache and database.
Con: Higher write latency due to dual write (cache + db).

Use Case: Banking systems. Must reflect latest balances; consistency > latency.

3. Write-Back Cache​

Read:
User -> Read -> Cache
-> Return Data

Write: (Async DB update)
User -> Write -> Cache
-> (Async) Write to Database

At any point:
Database = ~90 records (lagging behind due to async writes)
Cache = 100 records (source of truth)
  • Cache is updated immediately
  • Database is updated asynchronously (batched or delayed)
  • Risk of data loss if cache crashes before db update

Pro: Ideal for write-heavy scenarios; Optimizes writes by batching database updates.
Use Case: Real-time analytics dashboard. Temporary data loss is acceptable. Throughput > durability.

4. Redis Pub/Sub Caching (complex)​

Read: (Real-time listening)
User -> Subscribes to a Channel
-> Receives Updates Instantly

Write: (Broadcast updates)
Producer -> Publish to Channel
-> All Subscribers Receive Instantly

At any point:
Database = Optional or external for persistence
Cache = 0 records (Holds no state; transient message bus)
  • Messages are not storedβ€”only in-flight delivery
  • If a user isn't listening when the message is published, they miss it

Pro: Ultra low-latency updates to many clients simultaneously Con: No message persistence - missed updates are permanently lost.

Use Case: Live sports scoring system, Only latest score matters

tip

Redis Streams is a durable alternative to Pub/Sub

6. Distributed Caching πŸš€β€‹

Read: (Multi-node lookup)
User -> Read -> Cache Node 1
-> (Miss) -> Cache Node 2
-> (Miss) -> Database
-> Store in Appropriate Cache Node

Write: (Node synchronization)
User -> Write -> Primary Cache Node
-> Sync to Secondary Nodes
-> Write to Database

At any point:
Database = 100 records
Cache = 100 records distributed across nodes:
- shards: node A = 30, node B = 70
- replicas: all nodes hold full copies (100 records each)
- serves read traffic

Pro: Horizontally scalable and available with support for millions of concurrent users. High available, low latency and geographic scale.
Con: Complex consistency and synchronization between cache nodes.
Use Case: Global session management system

SD - Message Processing

Β· 5 min read

Imagine a busy restaurant kitchen where food orders come in, get processed by the chefs, and are eventually delivered to customers. Different messaging systems work like different ways the restaurant organizes and manages orders.

1. Kafka: The Smart Order Board​

  • There are multiple order boards (Kafka Topics) where incoming orders are written.
  • Each order is time-stamped and stays on the board for a long time.
  • Multiple chefs (consumers) poll frequently or look at the board to process order as soon as they arrive.
  • If a chef misses an order, they can go back and check the history.
  • Orders are organized into lanes (partitions) so that multiple chefs can work in parallel.
  • Chefs can form consumer groups, where a team of chefs collectively works on the same order board, ensuring load is balanced among them.
Different Kafka/Kitchen Setups

1. Real-Time Processing Setup:​

  • The order board updates continuously with new orders.
  • Orders stay visible for a configured time period (retention period).
  • Chefs pick up orders as they appear.
  • Configuration in Kafka:
    • Short retention period (e.g., a few hours or a day) to avoid storing unnecessary history.
    • Consumers poll frequently to process messages as soon as they arrive.
  • Great for: Live dashboards, instant notifications, real-time tracking.

2. Complete History Setup:​

  • The order board maintains infinite retention of orders.
  • New chefs can access the complete history of past orders.
  • Configuration in Kafka:
    • Long-term storage enabled
    • Full retention policy activated
  • Perfect for: Audit trails, analytics, debugging issues.

3. Current State Setup:​

  • Only the latest version of each order stays on the board.
  • If a customer changes their order, the old one is replaced.
  • Focuses on current status rather than history.
  • Unlike the Complete History Setup, which retains all past orders, this setup only keeps the latest state of each order, making it more lightweight and optimized for real-time state tracking rather than event retention.
  • Ideal for: Inventory levels, current menu prices, user preferences.

4. Multi-Team Setup:​

  • Different kitchen teams work from the same order board.
  • Each team tracks their own progress independently.
  • Teams don't interfere with each other's work.
  • Key Contrast: Unlike Real-Time Processing Setup, which processes orders as they come in, this setup ensures that multiple independent groups can process the same data without conflicting with each other.
  • Configuration in Kafka:
    • Multiple consumer groups ensure different teams process the same data independently.
  • Best for: Parallel processing, multiple department coordination.

2. ActiveMQ/SQS: Head Chef Assigns In Order​

  • A head chef receives incoming orders and assigns each one to the next available chef.
  • Once assigned, no other chef can take that order.
  • Orders wait in line if all chefs are busy (queueing mechanism).
  • After preparation, the order ticket is removed (message is deleted).
  • Push vs Pull: In ActiveMQ/SQS, the head chef assigns (pushes) orders to available chefs. In Kafka, chefs check the order board and pick up the next order when they are ready to work on it.
  • No History: Once an order is taken, it disappears.

3. Redis Pub/Sub: Order Announcement System​

  • The kitchen has a loudspeaker system where new orders are called out.
  • All available chefs hear the announcement at the same time.
  • If a chef hears the order and decides to work on it, they start preparing the meal immediately.
  • If a chef isn't present or paying attention, they miss the announcement forever.
  • No records of past announcements are kept.
  • Push vs Pull: In Redis Pub/Sub, orders are announced over a loudspeaker, meaning all chefs receive the message (push) at the same time without having to check for new orders (pull). In Kafka, chefs must check the order board and pick up new orders themselves (pull-based system).
  • Ephemeral: No historyβ€”if you're not listening, you miss the order.

4. Redis Streams: Last 100 Live Orders​

  • Orders are displayed in the order they arrive with timestamps.
  • Multiple chefs can take orders and prepare them at different speeds.
  • The system keeps only the last 100 orders visible at any time.
  • Chefs can review past orders within retention limits before they expire.
  • Limited Replayability:
    • Redis Streams does not store an indefinite history of orders. Instead, it keeps only the most recent ones (e.g., last 100 orders).
    • If a chef wants to review older orders, they must do so before they expire or get deleted.
    • In contrast, Kafka retains a full log for a configurable duration (days/weeks) and allows replaying from any past point
  • Processing Flexibility: Unlike a queue (e.g., Redis List), where once a chef picks an order, it disappears for everyone.

Summary​

SystemKitchen RoleBest ForLimitation
KafkaSmart Order BoardReal-time & historical event processing, analytics, parallel consumer groupsRequires more storage, consumers must poll
ActiveMQ/SQSOrder Distribution SystemTask queues, one-time message delivery, load balancingNo message history, strict first-come-first-serve
Redis Pub/SubKitchen Announcement SystemLive notifications, real-time updates, chat messagingNo replay or history, must be listening to receive
Redis StreamsOrder Tracking SystemRecent event replay, flexible processing speeds, lightweight historyLimited retention, older messages expire

SD - REST APIs

Β· 3 min read

GET Search Requests​

ExampleSearch QueriesUse Case
/events?name=bollywood& date=xx-xxQuery ParametersSimple, common searches with 1-2 specific filters.
/events/search?keyword=partyDedicated EndpointAdvanced search. same keyword "party" is matched against multiple fields (title, description, tags) on backend
/events/search with a request bodyPOST with BodyComplex, nested, or structured search criteria
Sample Example
POST /events/search  // POST for complex search
{
"keyword": "bollywood",
"location": "Delhi",
"dateRange": {
"from": "2025-01-01",
"to": "2025-01-31"
},
"maxParticipants": 100
}

POST Requests​

ExampleRequest TypeUse Case
/eventsSimple CreateBasic resource creation with a single object
/events/batchBatch CreateCreate multiple resources in a single request to reduce API calls
/events/{id}/duplicateAction EndpointPerform specific actions that don't fit CRUD operations
Sample Example
// Simple Create
POST /events
{
"title": "Summer Music Festival",
"date": "2025-07-15",
"location": "Central Park"
}

// Batch Create
POST /events/batch
{
"events": [
{
"title": "Workshop 1",
"date": "2025-08-01"
},
{
"title": "Workshop 2",
"date": "2025-08-02"
}
]
}

// Action Endpoint
POST /events/123/duplicate
{
"newDate": "2025-09-15",
"preserveAttendees": false
}

Resource Relationships (Comments on Events)​

ExampleRequest TypeUse Case
/events/{id}/commentsNested ResourceCreate a comment directly related to a specific event
/events/{id}/comments/batchBatch NestedAdd multiple comments to an event in a single request
/commentsIndependent ResourceCreate comments with flexible relationships, useful when commenting on multiple types of content
/comments/reply/{parentId}Threaded CommentsCreate nested/reply comments, supporting comment threads
Sample Example
// Simple Comment Creation
POST /events/123/comments
{
"content": "Great event! Looking forward to it.",
"userId": "456"
}

// Independent Comment Creation
POST /comments
{
"content": "Can't wait!",
"userId": "456",
"resourceType": "event",
"resourceId": "123"
}

// Batch Comment Creation
POST /events/123/comments/batch
{
"comments": [
{
"content": "Is parking available?",
"userId": "456"
},
{
"content": "What's the dress code?",
"userId": "789"
}
]
}

// Threaded Comment Reply
POST /comments/reply/789
{
"content": "Yes, there's a parking garage next door",
"userId": "101",
"eventId": "123"
}

GET Details Requests​

ExampleUse Case
/events/{id}Retrieve detailed information about a specific event
/events/{id}/commentsGet all comments related to a specific event
/events/{id}/comments/{commentId}Retrieve a specific comment related to an event
/comments/{commentId}Retrieve a specific comment without requiring event context
/files/{fileId}/presigned-urlRetrieve a presigned URL to access a specific file. GET as it's a read only operation
Sample Example
// Get Event Details
GET /events/123

// Get Event Comments
GET /events/123/comments

// Get Specific Comment (Event Context)
GET /events/123/comments/456
// This pattern may be appropriate in cases where the parent-child relationship needs to be explicitly validated or enforced.

// Get Specific Comment (Independent Access)
GET /comments/456

// Get Presigned URL for a File
GET /files/789/presigned-url
// Use this pattern when the file is a standalone entity, and a temporary URL is required to access it.

SD - Search and Database

Β· 7 min read

Search Patterns​

Query TypeIndex TypeTools
Text search ("Pizza Hut")Full-text search by inverted indexElasticsearch, Postgres + PG_TRGM extension
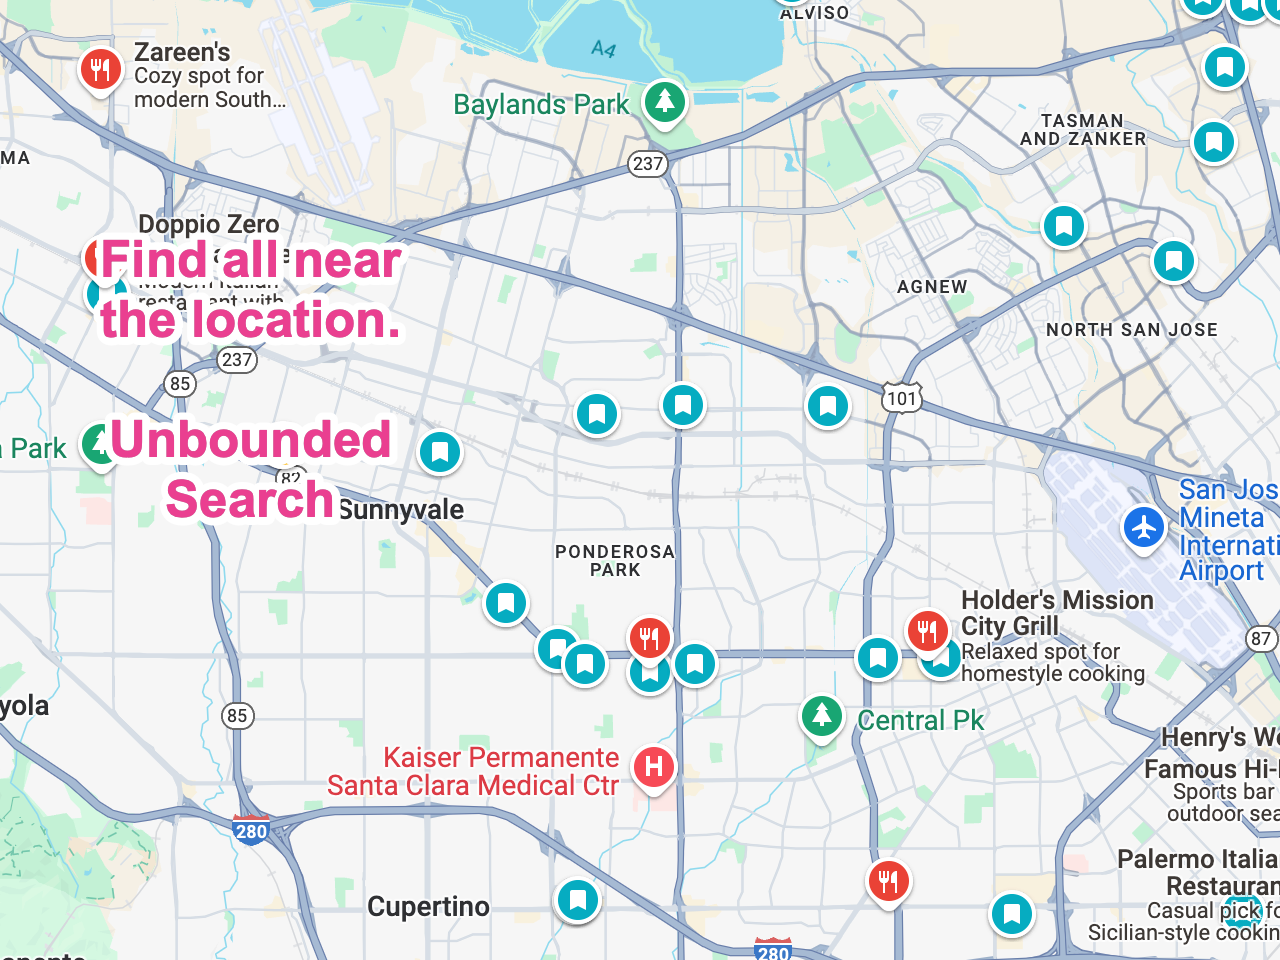
Find nearby locations (restaurants within 2 miles) Unbounded searchGeospatial index (Quadtree, GeoHash)ElasticSearch (GeoHash), Postgres + PostGIS
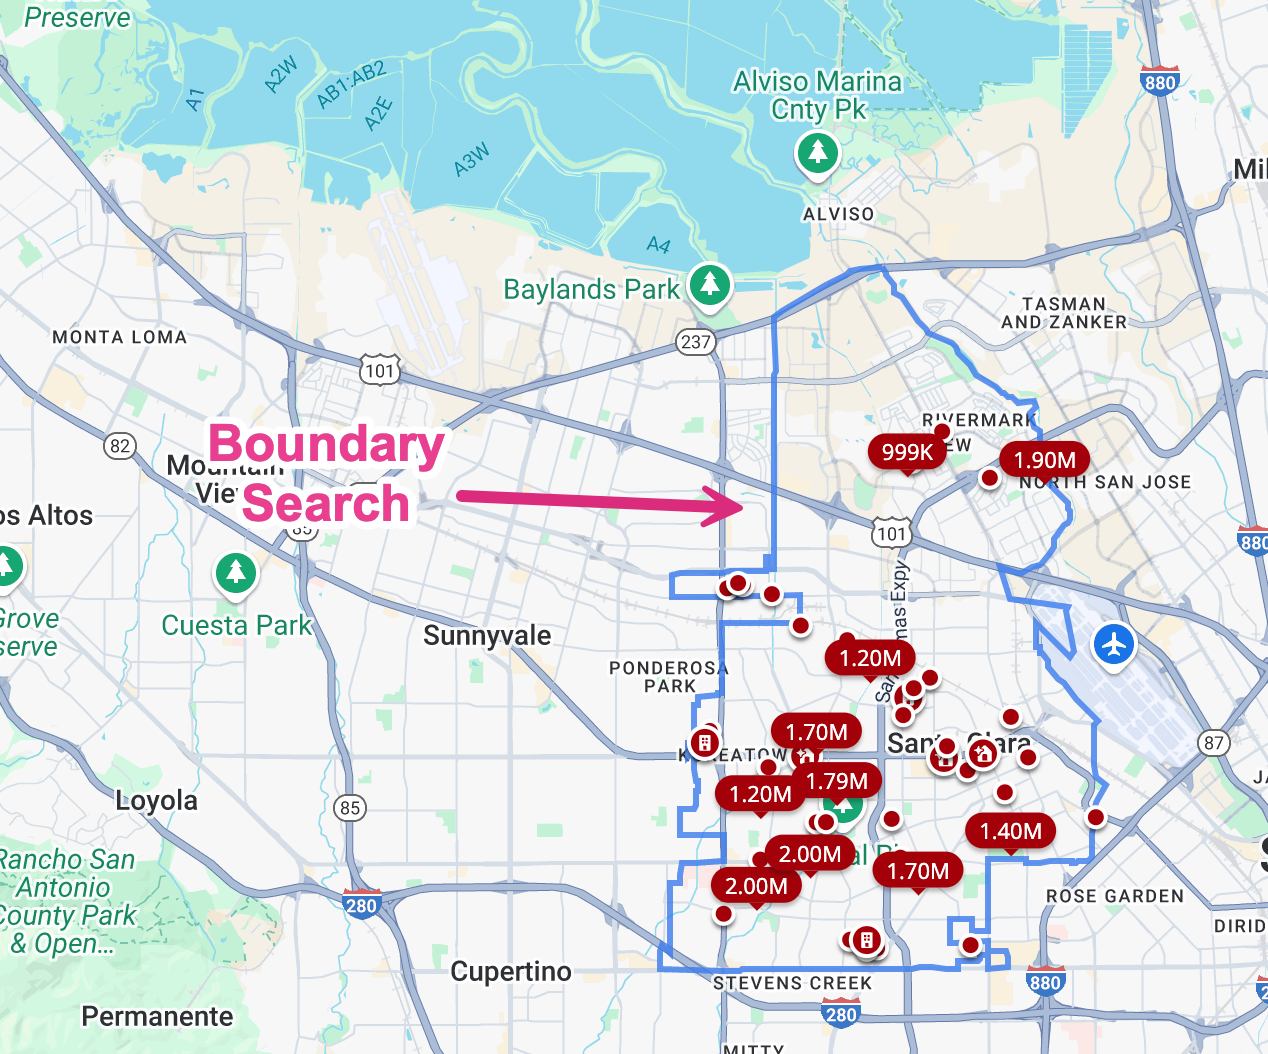
Search within a polygon (e.g., restaurants within Santa Clara county) BoundaryGeospatial index with polygonsElasticSearch (GeoHash), Postgres + PostGIS
Category search (e.g., "restaurants")B-Tree index (natively supported)Elasticsearch, Postgres

Elasticsearch and Postgres allow combining various types of indexes (e.g., full-text, geospatial, B-Tree) in a single search query.

Sample Query with 3 Indices
CREATE TABLE locations (
id,
name TEXT,
description TEXT, // Search using Inverted Index
category TEXT, // Search using B-tree
coordinates GEOGRAPHY(Point, 4326) // Search using GIS extension
);

CREATE INDEX category_idx ON locations (category); // B-tree Index
CREATE INDEX geo_idx ON locations USING gist (coordinates); // GIS index
CREATE INDEX description_idx ON locations USING gin (to_tsvector('english', description));

// Query using all three indexes
SELECT * FROM locations WHERE category = 'restaurant'
AND ST_DWithin(coordinates, ST_MakePoint(-122.4194, 37.7749)::geography, 2000)
AND to_tsvector('english', description) @@ to_tsquery('pizza');

Database Constraints​

1. Problem: Handle Simultaneous Writes​

Example - multiple users update the same record simultaneously

ApproachDescriptionProsCons
Pessimistic LockingLocks a record when a user accesses it, preventing others from modifying it until the lock is released.- Simple to implement.- Performance bottlenecks if locks are held too long.
- Risk of deadlocks.
Optimistic Locking (OCC)Allows multiple users to access a record but checks for conflicts during updates using a version or timestamp field.- Better performance for read-heavy systems.- Updates can fail, requiring retry logic.
- Not suitable for write-heavy systems.
Status + Expiration TimeAssigns a status (e.g., "in-use") and an expiration time to a record. Expired records are unlocked automatically.- Resolves abandoned operations naturally.- Managing abandoned rows is difficult.
Distributed Lock with TTLUtilizes Redis or Zookeeper to create distributed locks with a Time-To-Live (TTL).- TTL prevents stale locks.- Adds external dependency.

Optimistic Concurrency Control is same as Optimistic locking.

  1. A transaction reads data and remembers its state (e.g., timestamp or version).
  2. The transaction performs update operations.
  3. Before committing, it checks whether the version has been changed since the initial read.
  4. If the version is unchanged, the transaction commits; otherwise, it fails.
Implementation Samples

Pessimistic Locking​

-- Application Layer: Starts the transaction
BEGIN;

-- Database Layer: Lock the row so no one else can modify it
SELECT * FROM users WHERE id = 1 FOR UPDATE;

-- Business Logic (e.g., validate balance > 100)

-- Database Layer: Deduct $100 from balance
UPDATE users SET balance = balance - 100 WHERE id = 1;

-- Application Layer: Commit the transaction
COMMIT;

Optimistic Locking​

def get_order(order_id):
""" Fetches the current order status and version from DynamoDB """
response = table.get_item(Key={'order_id': order_id})
return response.get('Item', None)

def update_order(order_id, new_status):
""" Updates order status only if no other process modified it """

# Step 1: Fetch the current version of the order
order = get_order(order_id)

current_version = order['version'] # Get current version stored in DB

try:
# Step 2: Attempt to update the order with version check
response = table.update_item(
# Like a WHERE clause: Specifies which order to update
Key={'order_id': order_id},

# UpdateExpression: Defines what should be updated in the table.
# ExpressionAttributeValues: Provides actual values for placeholders inside the query.

# Update the order status and increment the version number
UpdateExpression="SET order_status = :new_status, version = version + 1",

# The update happens only if the ConditionExpression is true
# i.e. current version in the database matches expected_version.
ConditionExpression="version = :expected_version",

# Placeholder values for security and performance
ExpressionAttributeValues={
':new_status': new_status, # the new value being written into the database.

':expected_version': current_version

# represents the current version that was read from the database.
# ensures that no other process has modified the order before our update.
# Used inside ConditionExpression to prevent overwriting concurrent updates.
}
)
print("Update successful:", response)

# User A tries to mark order "Shipped"
update_order("123", "Shipped")

# User B tries to mark order "Cancelled" (but order version might have changed)
# User B needs to retry after fetching the latest version.
update_order("123", "Cancelled") # This fails if version changed

Status + Expiration Time​

def acquire_document_lock(doc_id, user, lock_duration=300):
"""
Acquires a lock on a document with automatic expiration.

- The lock expires after `lock_duration` seconds (default: 5 minutes).
- Lock acquisition fails if another user is already holding it and it hasn't expired.
"""

now = int(time.time()) # Get current system time
ttl = now + lock_duration # Set lock expiration time

try:
response = table.update_item(
Key={'doc_id': doc_id},

# Set lock status, owner, and expiration time
UpdateExpression="SET status = :status, locked_by = :user, ttl = :ttl",

# Allow lock acquisition only if it’s unlocked or expired
ConditionExpression="attribute_not_exists(status) OR ttl < :now",

ExpressionAttributeValues={
':status': 'locked', # Represents locked state
':user': user, # The user acquiring the lock
':ttl': ttl, # Lock expiration timestamp
':now': now # Current system time (used for expiration check)
},

ReturnValues="ALL_NEW" # Returns updated lock info for debugging
)
print(f"Lock acquired for document {doc_id} by {user}. Expires at {ttl}.")
return True

# Example
if acquire_document_lock(doc_id, user):
try:
print("Document locked and being processed...")
finally:
release_document_lock(doc_id, user)
else:
print("Could not acquire lock")

Distributed Lock with TTL​

def acquire_lock(key, ttl=10):
# Query Layer: Create a lock with a TTL
lock_acquired = redis_client.set(key, "locked", ex=ttl, nx=True)
return lock_acquired

def release_lock(key):
# Query Layer: Explicitly release the lock
redis_client.delete(key)

# Try acquiring lock
if acquire_lock("leaderboard_update", ttl=10):
try:
print("Processing leaderboard update...")
finally:
release_lock("leaderboard_update")
else:
print("Lock already held by another process.")

2. Problem: Enforcing uniqueness​

Example allow only one post by a user on one business

Solution: Apply unique constraints

Multi-Part Upload Big Files​

A presigned URL is a temporary, signed URL that allows a client to upload (or download) an object to/from a storage system (like Amazon S3) without requiring direct authentication.

Each presigned URL is specific to a resource (like a file or chunk)

Process flow for resumable upload of a large file and upload only the missing chunks using presigned URLs.

  1. Client calculates the file fingerprint
  2. Client requests file metadata:
    • The client sends the fingerprint to the server.
    • The server checks if the file exists and retrieves the metadata (e.g., uploaded chunks and missing chunks).
  3. Server provides upload instructions:
    • For missing chunks, the server generates presigned URLs for each chunk.
    • Each chunk typically maps to a part number in a multipart upload.
    • Presigned URLs are chunk-specific because each upload must be directed to a specific part.
  4. The client uploads the missing chunks using the provided presigned URLs.
  5. As each chunk is uploaded, S3 send event notification to Lambda function which updates the status of chunk in FileMetaData

Why is each chunk tied to a presigned URL?​

  • Security: Each presigned URL is generated for a specific chunk and includes security parameters, such as its expiration time, headers, and permissions. This prevents unauthorized uploads or tampering.
  • Concurrency: Using separate URLs for chunks allows clients to upload chunks in parallel, speeding up the upload process.
  • Resumability: If the upload fails partway, the server knows exactly which chunks are missing and can generate new presigned URLs for only those chunks.

AWS - OpenSearch

Β· 8 min read

1. The Restaurant (OpenSearch Cluster)​

In OpenSearch, a cluster is like a restaurant. It has many moving parts: kitchen staff, cooking stations, storage for ingredients, and a management structure. All of these work together to deliver "dishes" (search results and indexing operations) to your "customers" (applications).

  • Cluster: Everything in OpenSearchβ€”indexes, nodes, shards, queriesβ€”lives inside this restaurant (cluster).
  • Dedicated Master Nodes: Think of these as the head chefs. Their primary duty is to oversee and coordinate the rest of the staff.
    • Ensuring all stations (nodes) are running efficiently
    • Assigning dishes (work) to the right line cooks (data nodes)
    • Adjusting the kitchen layout as needed (shard allocation)
    • Hiring or removing staff (adding/removing nodes)
    • They do not store data or execute queriesβ€”just like head chefs don't actually chop vegetables or sautΓ© onions.
  • Data Nodes (Hot): These are the line cooks, actively preparing meals based on customer orders (queries) or adding new recipes (indexing new data).
    • It's an EC2 instance running the OpenSearch software. It has CPU, RAM, network, etc. The data node is responsible for the actual "work" of storing and retrieving data.
  • Hot Storage: Every kitchen needs quick access to fresh ingredients. Hot storage (SSD storage on EC2 instances) holds the most frequently used data, just like a busy restaurant keeps essentials within arm's reach.
    • Warm/Cold Storage (Optional): Sometimes, however, the restaurant moves rarely used ingredients to other storage areas:
    • Warm Storage (Extra Shelves in the Kitchen): For ingredients you don't use every minute but still need occasionally.

Index, Shard & Alias: How Data is Stored & Retrieved​

An index in OpenSearch is like the organized ingredient storage bins in the kitchen β€” where everything needed for cooking (documents) is stored in a structured way.

  • Every ingredient (document) is labeled and indexed for quick access
  • Each storage bin (index) is specialized for a particular type of data Indexes are optimized for fast lookup, just like a well-organized kitchen keeps essential ingredients easy to find.

For example:

  • A burger restaurant might have an index for:
    • Burger ingredients
    • Drink ingredients
    • Side dishes
  • Similarly, OpenSearch might have indexes for:
    • Customer records
    • Product catalog data
    • Logs and analytics

Shard: A busy restaurant doesn't store all ingredients in a single massive storage binβ€”instead, it breaks them down into multiple smaller bins for better organization and access.

  • Each storage bin (index) is divided into multiple smaller compartments (shards)
  • This allows multiple line cooks to access different compartments of the same storage bin simultaneously
  • If one compartment is being used, other cooks can still access the ingredients in other compartments

Example:

  • Instead of one massive storage bin for all meats, you might have it divided into 10 smaller compartments
  • This way, multiple cooks can access different parts of the meat storage simultaneously
  • These smaller compartments (shards) make ingredient retrieval faster and more efficient

Alias: A restaurant often renames storage areas for convenience:

  • Instead of saying: "Go to the new section labeled Meat Storage 2024"
  • The chef might simply say: "Go to the Meat Storage" (which always points to the latest section)

In OpenSearch:

  • An alias is a shortcut name for an index or group of indexes
  • It allows applications to refer to data without worrying about version changes

Example: You store your customer data in the customer_data_v1 index, then change schema and move data to the customer_data_v2 index. Without alias, your application would need to know about the latest index name e.g. customer_data_v2 to run queries. With alias, you can just use the alias customer_data to point to the latest version dynamically and change the alias to point to the new index when you update the schema.

2.1 What Are Shards?​

  • A shard is like a cooking station that handles a slice of the entire menu (the index). The menu itself can be broken into multiple sections (shards). Each station focuses on its assigned portion.

2.2 Shard Strategy and Cluster Scaling​

  • Goal: Distribute each index evenly among the data nodes. It's best if the number of stations (shards) is a multiple (or factor) of the number of cooks (data nodes), so every cook manages the same amount of work.

  • Shard Size: If a single station has to handle an enormous portion of the menu, it becomes overloaded. Conversely, if you have too many tiny stations, managing them all wastes time. A typical sweet spot might be:

    • 10–30 GiB per shard for "search-intense" workloads.
    • 30–50 GiB per shard for logs-heavy workloads.
    • 50 GiB is usually the upper limit to ensure quick responses and easier management.
  • Shard Count: The number of shards per index should be balanced against your total data size. If you only have 5 GiB total, you don't need multiple stationsβ€”one shard suffices. But if you have hundreds of GB or TB, multiple shards help the workload scale.

2.3 Shards per Data Node (How Many Stations Can One Cook Manage?)​

  • Each cook (data node) has a certain attention limit (JVM heap memory). You don't want to overwhelm them with too many stations. A rule of thumb is no more than 25 shards per GiB of heap. For a node with 32 GiB heap, staying under 800 shards is wise. There's also a hard limit of around 1,000 shards per node in many production environmentsβ€”going beyond that is risky.

2.4 Shard to CPU Ratio​

  • Every time a shard is asked to do somethingβ€”whether slicing veggies or cooking a dishβ€”it needs a dedicated stove burner (vCPU). If your cook (node) has 8 burners (vCPUs), a recommended approach is to give them around 6 stations to handle comfortably, leaving a little headroom.

3. How It All Relates (Keeping the Restaurant Balanced)​

  • Cluster = The entire restaurant.
  • Nodes = Your cooks (data nodes) plus any head chefs (master nodes).
  • Indexes = Specific menus or categories of dishes you serve.
  • Shards = Individual cooking stations that handle a slice of a menu.
  • Hot Storage = The main fridge and pantry holding regularly used ingredients (hot data).

By balancing the number of stations (shards) with the number of cooks (nodes), you keep the restaurant efficient. Having hot storage means all the frequently accessed ingredients are at arm's reach. If you had warm or cold storage, it'd be akin to storing less popular or older ingredients in a distant pantry.

4. Building a Buffer into Your "Ingest Pipeline" (Smoothing Out Rush Hours)​

4.1 What is the Ingest Pipeline?​

  • When new ingredients arrive at the restaurant or new "orders" (documents to index) come in, they have to be processed before they're fully available on the menu. This flowβ€”from receiving the raw ingredient to storing it in the fridgeβ€”is the ingest pipeline.

4.2 Why Buffering Matters​

  • If your restaurant suddenly gets a massive delivery of ingredients during peak dinner service, your cooks (data nodes) might get overwhelmed trying to store or prepare them all immediately. Two general strategies exist:
    • Scale Up: Add more cooks and bigger storage to handle these spikes at full speed. This is expensive and might be overkill if spikes are rare.
    • Build a Buffer: Accept deliveries in a "waiting room" (an S3 bucket or a queue) to handle them gradually. This buffer is like a short-term holding area where you offload the initial surge. Then, you feed ingredients into the main fridge at a manageable rate.

4.3 How to Implement a Buffer​

  • Buffer Location: An S3 bucket or a queue system (like Amazon SQS or a custom queue). Think of it as a secondary storage room near your loading dock.
  • Flow Control: Automated systems (like Lambda or OpenSearch Ingestion) that pull ingredients from the buffer into the main fridge (your OpenSearch hot storage) at a steady pace. You can tune how fast or slow this "intake" goes.
  • Trade-Off: If data freshness is crucial and you need new ingredients instantly ready for the cooks, you might limit buffering. But if you can tolerate a small delay, buffering saves you money and prevents chaos in the kitchen.

5. Putting It All Together​

  • Cooks (Data Nodes) = Handle day-to-day cooking (index and query requests).
  • Head Chef (Dedicated Master) = Coordinates big decisions but usually doesn't cook.
  • Cooking Stations (Shards) = Each station handles a slice of your menu (index).
  • Hot Storage (Main Fridge) = Fast, easily accessible storage for active data.
  • Shard Sizing & Distribution = Keep stations well-proportioned, so no single cook is overloaded.
  • Buffering = Smooths out deliveries (indexing spikes), so you don't drown in new orders during rush hour.

AWS - Block Storage

Β· 3 min read

Amazon Elastic Block Store (EBS) provides persistent storage for Amazon EC2 instances.

Imagine a restaurant where each chef (EC2 instance) has their own personal fridge (EBS volume) for storing ingredients.

Key Characteristics​

  • Local Fridge in the Same Station (Availability Zone)

    • When you bring in a fridge (create an EBS volume), it stays within the same kitchen station (Availability Zone or AZ).
    • To prevent losing ingredients in case the fridge's hardware fails, it automatically has redundant components (replication) within that station.
  • Attach to One Chef at a Time (Single Instance Attachment)

    • A fridge belongs to a specific chef (EC2 instance). Even if another chef is in the same kitchen station (AZ), they cannot access the fridge unless the first chef detaches from it.
    • The fridge must stay within the same AZ where it was created.
  • Multi-Attach: One Fridge Shared by Multiple Chefs

    • Certain premium fridges (Provisioned IOPS SSD, io1 volumes) in a Nitro-based kitchen allow multiple chefs (EC2 instances) to access the same fridge simultaneously.
    • Other fridge types don't allow multiple chefs to open them at once.
  • Independent from the Chef's Employment

    • The fridge isn't discarded if the chef leaves (instance terminates). You can choose not to remove it automatically.
    • It can remain off-instance and be reassigned if needed.
  • Live "Fridge" Upgrades (Volume Modification on the Fly)

    • If you need a bigger fridge (increase volume size) or a different model (change volume type), you can upgrade on the fly without disrupting the chef's work.
  • Lock and Key Security (Encryption)

    • (Optional) Every fridge come with a secure lock (encryption) using AES-256 encryption.
    • Ensures only authorized personnel can open or move the fridge.
  • High Reliability (99.999% SLA)

    • The fridge is incredibly reliable, designed to operate for nearly its entire service life (99.999% SLA).

Common Misunderstandings​

  1. "Fridges Are Replicated to Another Restaurant Region"

    • Incorrect. Fridges are only replicated within the same kitchen station (AZ). There's no automatic copy to another Region.
  2. "Any Chef in Any Station Can Use the Same Fridge"

    • Incorrect. A fridge created in one station (AZ) cannot be simply wheeled to another station. You can only attach it to chefs in the same Availability Zone. That too you need to detach from existing chef, before attaching to another chef.
  3. "Snapshots Go to Amazon RDS"

    • Almost but not quite. When you take a snapshot (backup) of a fridge, that snapshot is stored in Amazon S3, not Amazon RDS.
    • Think of S3 as a big central warehouse where you can keep a backup of your fridge's contents for safekeeping.

Java - OOPS-2

Β· 4 min read

Locker and Package OOP Design​

Class/ComponentOOP ConceptPurpose
Locker (abstract)Abstract classShared locker logic, open/close, lock/unlock
PackageClassRepresents a package with a unique identifier and size
StandardLocker, LargeLockerInheritanceDifferent locker behaviors extending base functionality
Door, LockCompositionBuilding blocks that make up a complete locker
Openable, LockableInterfacesCapability contracts for locker components
LockerControllerPolymorphismManages different locker types uniformly

Abstract Class β€” Elevator​

Base class with partial implementation

public abstract class Locker {

// 🟑 State variables - no behaviors.

protected final string lockerId;
protected boolean isOccupied;
protected Package currentPackage;

// 🟑 Compositions
// These are classes with behaviors (door.open(), lock.unlock())
protected final Openable door; // interface type; logic for opening/closing the door
protected final Lockable lock; // interface type; logic for locking/unlocking the locker

public Locker(String lockerId, Openable door, Lockable lock) {
this.lockerId = lockerId;
this.door = door;
this.lock = lock;
}

// 🟑 Abstract methods - each locker type must implement these
public abstract boolean canFit(Package pkg);

// 🟑 Shared method with concrete implementation
public void storePackage(Package pkg) {
// open door
// generatePasswordAndLock
// close door and return password
}

public void releasePackage(String packageId) {
// unlock
// Open door
// close door
}
}

Concrete Classes - StandardLocker, LargeLocker​

public class StandardLocker extends Locker {

public StandardLocker(String lockerId) {
super(lockerId, new ManualDoor(), new ManualLock())
}

@Override
public boolean canFit(Package pkg) {
// check package size
}
}

public class LargeLocker extends Locker {

public LargeLocker(String lockerId) {
super(lockerId, new ElectricDoor(), new ElectricLock());
}

@Override
public boolean canFit(Package pkg) {
// check package size
}
}

Interfaces - Openable, Lockable​

public interface Openable{
void open();
void close();
}

public interface Lockable {
String generatePasswordAndLock();
boolean unlock(String password);
}

Interface Implementations​

public class ManualDoor implements Openable {
@Override
public void open() {
// manual door opening logic
}

@Override
public void close() {
// manual door closing logic
}
}

public class ElectricDoor implements Openable {
@Override
public void open() {
// electric door opening logic
}

@Override
public void close() {
// electric door closing logic
}
}
public class ManualLock implements Lockable {
private String password;

@Override
public String generatePasswordAndLock() {
// manual lock locking logic
}

@Override
public boolean unlock(String password) {
// manual lock unlocking logic
}
}

public class ElectricLock implements Lockable {
private String password;
@Override
public String generatePasswordAndLock() {
// electric lock locking logic
}

@Override
public boolean unlock(String password) {
// electric lock unlocking logic
}
}

In Locker class, instead of concrete class (e.g. ManualLock or ElectricLock), use interfaces (Lockable)

protected final Openable door;
protected final Lockable lock;

LockerController​

public class LockerController {
private final List<Locker> lockers;
private final Map<String, Locker> passwordToLockerMap = new HashMap<>();

public LockerController(List<Locker> lockers) {
this.lockers = lockers;
}

public String assignLocker(Package pkg) {
// Find first available locker that can fit the package
for (Locker locker : lockers) {
if (!locker.isOccupied && locker.canFit(pkg)) {
String password = locker.storePackage(pkg);
passwordToLockerMap.put(password, locker);
return password;
}
}
throw new RuntimeException("No available locker found for package: " + pkg.getId());
}

public void retrievePackage(String password) {
Locker locker = passwordToLockerMap.get(password);
if (locker == null) {
throw new RuntimeException("Invalid password");
}
locker.releasePackage(password);
passwordToLockerMap.remove(password);
}
}
public class LockerSystem {
public static void main(String[] args) {
List<Locker> lockers = List.of(
new StandardLocker("L1"),
new StandardLocker("L2"),
new LargeLocker("L3"),
new LargeLocker("L4")
);

LockerController controller = new LockerController(lockers);

Package pkg1 = new Package("PKG001", PackageSize.SMALL);
Package pkg2 = new Package("PKG002", PackageSize.MEDIUM);

String password1 = controller.assignLocker(pkg1);
String password2 = controller.assignLocker(pkg2);

controller.retrievePackage(password1);
}
}

Java - OOPS

Β· 6 min read

Object-Oriented Programming Basics​

ConceptMeaningReal Elevator Use Case
InheritanceOne class derives from another, reusing and extending functionalityDifferent types of elevators: ExpressElevator, FreightElevator extend Elevator
InterfaceA contract defining capabilities without implementationMovable, Openable actions each elevators has
Abstract ClassBase class with partial implementation and some abstract methodsBaseElevator class defines shared logic, but leaves specifics like move() to subclasses
PolymorphismSame method behaves differently based on object typeelevator.handleRequest() works differently for express vs standard elevators
EncapsulationInternal state is hidden, accessed via controlled methodsElevator's currentFloor, direction, and doorStatus are accessed via getters/setters
CompositionBuilding complex objects using other objectsElevator is composed of Door, Motor

Abstract Classes vs Interfaces​

Both abstract classes and interfaces help define shared behavior.

  • Abstract classes are like partially prepared classes that you extend to create new classes. It has both fields and methods (which can be implemented or unimplemented - abstract methods)
  • Interfaces are like contracts that define capabilities without implementation. They define what a class must do, but not how it should do it. It doesn't hold state

Elevator OOP Design​

Class/ComponentOOP ConceptPurpose
Elevator (abstract)Abstract classProvides shared elevator logic and structure
StandardElevator, ExpressElevatorInheritanceDifferent elevator behaviors extending base functionality
Door, MotorCompositionBuilding blocks that make up a complete elevator
Movable, OpenableInterfacesCapability contracts for elevator components
ElevatorControllerPolymorphismManages different elevator types uniformly

Abstract Class β€” Elevator​

Base class with partial implementation

public abstract class Elevator {

// 🟑 State variables - no behaviors.
// Protected - accessible to child classes
protected int currentFloor;
protected Direction direction;
protected ElevatorState state;

// 🟑 Compositions
// These are classes with behaviors (door.open(), motor.start())
protected final Door door;
protected final Motor motor;
protected final ElevatorPanel panel;

// TreeSet - sorted set. Auto sort on insert
protected TreeSet<Integer> destinationFloors = new TreeSet<>();

public Elevator() {
this.door = new Door();
// ... initialize variables

this.currentFloor = 0;
this.direction = Direction.NONE;
}

// 🟑 Abstract methods - each elevator type must implement these
public abstract void move();
public abstract void handleRequests();

// 🟑 Shared method with concrete implementation
public void pressButton(int floor) {
destinationFloors.add(floor);
}
}

Inheritance β€” Specific Elevators​

Different elevator types share core functionality (abstract class) but behave differently (concrete implementation class).

public class StandardElevator extends Elevator {
@Override
public void move() {
// Standard elevator logic
}

@Override
public void handleRequests() {
// Standard elevators serve all floors
}

// automatically inherits pressButton from Elevator
}

public class ExpressElevator extends Elevator {
@Override
public void move() {
// Can skip floors to reach destinations faster
// Moves the elevator one floor closer to the next destination.
// Updates elevator direction, and state
}

@Override
public void handleRequests() {
// Might prioritize express floors or ignore some requests
// checks whether the elevator has reached a floor someone requested.
// If yes,
// open the door,
// removes that floor from the destination list,
// and sets the elevator's state to IDLE.
}

// automatically inherits pressButton from Elevator
}

Interfaces​

Interfaces specify what a class can do, not how it does it.

public interface Movable {
void move();
}

public interface Openable {
void open();
void close();
}

Classes implementing interfaces must provide concrete implementation for the methods

public class Door implements Openable {
public void open() { // do xyz }
public void close() { // do abc }
}

ElevatorController - System Orchestrator​

It is responsible for coordinating multiple elevators, distributing request to the right elevator and triggering movement.

public class ElevatorController {

// Using Elevator abstract class - we can use any type of elevator
private final List<Elevator> elevators;

// Queue to hold incoming floor requests
// It's possible all elevators are busy, so we need to hold the request
private final Queue<ElevatorRequest> requestQueue = new LinkedList<>();

public ElevatorController(List<Elevator> elevators) {
this.elevators = elevators;
}

// Called whenever user presses a button (go to floor 5)
public void handleRequest(int requestedFloor) {
requestQueue.add(new ElevatorRequest(requestedFloor));
}

public void step() {
processRequests(); // assign pending requests to elevators
updateElevators(); // let elevators move and process floors
}

private void processRequests() {
// Process all pending requests and try to assign elevator
Iterator<ElevatorRequest> iterator = requestQueue.iterator();

while (iterator.hasNext()) {
ElevatorRequest request = iterator.next();
Elevator bestElevator = selectElevator(request.floor());

if (bestElevator != null) {
bestElevator.pressButton(request.floor());
iterator.remove(); // remove ONLY when it's been assigned
}
}
}

private Elevator selectElevator(int requestedFloor) {
// select the best elevator based on some criteria
}

private void updateElevators() {
for(Elevator elevator : elevators) {
elevator.handleRequests(); // Check if current floor is a destination
elevator.move(); // Move one floor if needed
}
}
}

// Request to move to a specific floor
public record ElevatorRequest(
int targetFloor,
Instant timestamp,
Priority priority
) {}

Elevator System​

public class ElevatorSystem {
public static void main() {
List<Elevator> elevators = List.of(
new StandardElevator(),
new ExpressElevator()
);

ElevatorController controller = new ElevatorController(elevators);

// Requests come in at different ticks
controller.handleRequest(5);
controller.handleRequest(1);
controller.handleRequest(10);

// Run simulation
for(int tick = 0; tick < 10; tick++) {
controller.step();
}
}
}

End to End Flow​

User presses button to go to floor 5 β†’ controller.handleRequest(5) β†’ adds to request queue.

tick β†’ controller.step()

processRequests() checks if any elevator can serve the request.
selectElevator(5) β†’ selects the best elevator for floor 5
bestElevator.pressButton(5) β†’ adds to elevator's destinationFloors

Elevator handles requests β†’ elevator.handleRequests() β†’ is current floor a destination? if yes, stop and open the door

Elevator moves β†’ elevator.move() β†’ moves the elevator one floor closer to the next destination

JS - File Streams

Β· 3 min read

In JS, typical array operations load the entire array in memory, which are impractical when you are working on large file. We use generators, iterators, and streams to process data in chunks for those cases.

  • Read a large file in chunks
  • Transform the data using generators and yield
  • Write the transformed data to a new file

1. Reading a Large File​

Use Node.js streams to read the file in chunks:

const fs = require('fs');

function createFileReader(filePath, chunkSize = 1024) {
const stream = fs.createReadStream(filePath,
{ encoding: 'utf8',
highWaterMark: chunkSize });

return stream;
}
  • fs.createReadStream reads the file in chunks defined by highWaterMark.

2. Transforming Data Using Generators and Iterators​

We use a generator function to process the file’s content line-by-line, allowing on-the-fly transformation without storing the entire file in memory.

async function* transformData(stream, transformer) {
let leftover = '';

// NOTE - for ...await.. of loop which waits for each chunk to load
for await (const chunk of stream) {

const lines = (leftover + chunk).split('\n');
leftover = lines.pop(); // Keep the last incomplete line for the next chunk

for (let line of lines) {
yield transformer(line);
}
}

if (leftover) {
yield transformer(leftover); // Process any remaining data
}
}
  • Reads file in chunks, splits it into lines.
  • Applies transformer function (similar to map() for arrays) to modify each line.
  • Uses yield to process each transformed line lazily.
function toUpperCase(line) {
return line.toUpperCase();
}

3. Writing Transformed Data to a New File​

To write the transformed data efficiently to a new file, we use write streams:

const fs = require('fs');

async function writeToLargeFile(outputPath, transformedStream) {
// Create a writable stream to write to the file
const writeStream = fs.createWriteStream(outputPath, { encoding: 'utf8' });

for await (const transformedLine of transformedStream) {

// Write the transformed line to the file
// If the internal buffer is full, write() returns false
if (!writeStream.write(transformedLine + '\n')) {

// Wait for the 'drain' event, which signals that the buffer has been flushed
await new Promise(resolve => writeStream.once('drain', resolve));
}
}

// Signal that no more data will be written to the stream
writeStream.end();

// Wait for the 'finish' event to ensure all data is flushed before resolving
await new Promise(resolve => writeStream.on('finish', resolve));
}
  • Uses fs.createWriteStream to write transformed lines incrementally.
  • Appends each line without loading the entire transformed content into memory.

4. Putting It All Together​

async function processLargeFile(inputPath, outputPath, transformer) {
const stream = createFileReader(inputPath);
const transformedStream = transformData(stream, transformer);
await writeToLargeFile(outputPath, transformedStream);
}

processLargeFile('input.txt', 'output.txt', toUpperCase)
.then(() => console.log('Processing completed'))
.catch(err => console.error('Error:', err));

JS - Concurrency

Β· 3 min read

Imagine you have a bank account and 10 transactions arrive at the same time β€” some deposit money, some withdraw it.

How do you ensure that all transactions are processed correctly without overwriting each other?


let accountBalance = 100;

// Simulating Concurrent Transactions
async function runTransactions() {
console.log(`Starting Balance: ${accountBalance}`);

await Promise.all([
addAmount(50), // Should be 150
addAmount(-30), // Should be 120
addAmount(20), // Should be 140
addAmount(-10), // Should be 130
addAmount(40) // Should be 170 --> Only this returns final output
]);

console.log(`Final Balance: ${accountBalance}`);
// Expected: 170, Actual: 140 as all transactions start with 100 balance
}

async function addAmount(amount) {
const balance = await getBalance();

const newBalance = balance + amount;

console.log(
"Read Balance:", balance,
"| Adding:", amount,
"| New Balance:", newBalance
);

await saveBalance(newBalance);
}

async function getBalance() {
return accountBalance;
}

async function saveBalance(newBalance){
accountBalance = newBalance;
}
runTransactions();
Read Balance: 100 | Adding: 50 | New Balance: 150
Read Balance: 100 | Adding: -30 | New Balance: 70
Read Balance: 100 | Adding: 20 | New Balance: 120
Read Balance: 100 | Adding: -10 | New Balance: 90
Read Balance: 100 | Adding: 40 | New Balance: 140

Final Balance: 140
  1. Each transaction reads 100 instead of the updated balance.
  2. Transactions compute their own new balance separately:
  3. Last transaction (+40) overwrites previous updates.

Challenges​

How do we prevent multiple operations from interfering with each other?

  • Locks? JavaScript doesn’t have built-in locks.
  • Sequential execution? But we still want concurrency.
  • Atomic updates? Possible, but how?

Solution: Amotic Updates using MUTEX​

A Mutex (Mutual Exclusion) ensures that only one operation modifies the balance at a time.

function createMutex() {
let locked = false;
const queue = [];

return {
lock: function() {
// Each lock call returns a promise
// the caller of lock, awaits for this to resolve
return new Promise((resolve) => {

if(!locked) {
// No one holds the lock yet - take it

locked = true;
resolve();
} else {
// lock is taken - queue up the resolver

queue.push(resolve);
}
});
},

unlock: function() {

if(queue.length > 0) {
// hand off the lock to the next waiting caller

const nextResolve = queue.shift();
nextResolve();
} else {
// no one is waiting - release the lock

locked = false;
}
}
}
}


const mutex = createMutex();

// βœ… Mutex-Protected Function
async function addAmountConcurrent(amount) {

await mutex.lock();

const balance = await getBalance();

const newBalance = balance + amount;
console.log(
"πŸ’° Read Balance:", balance,
"| Adding:", amount,
"| New Balance:", newBalance
);

await saveBalance(newBalance)

mutex.unlock();
}

let accountBalance = 100;

async function getBalance() {
return accountBalance;
}

async function saveBalance(newBalance) {
accountBalance = newBalance;
}

async function runTransactionsMutex() {
console.log(`Starting Balance: ${accountBalance}`);

await Promise.all([
addAmountConcurrent(50),
addAmountConcurrent(-30),
addAmountConcurrent(20),
addAmountConcurrent(-10),
addAmountConcurrent(40)
]);

console.log(`πŸ’° Final Balance: ${accountBalance}`);
}

Fixed final output

runTransactionsMutex();
πŸ’° Read Balance: 100 | Adding: 50 | New Balance: 150
πŸ’° Read Balance: 150 | Adding: -30 | New Balance: 120
πŸ’° Read Balance: 120 | Adding: 20 | New Balance: 140
πŸ’° Read Balance: 140 | Adding: -10 | New Balance: 130
πŸ’° Read Balance: 130 | Adding: 40 | New Balance: 170

πŸ’° Final Balance: 170

JS - Promises Basics

Β· 6 min read

JavaScript Promises​

JavaScript Promises simplify asynchronous programming by managing the execution and resolution of tasks that take time to complete.

A Promise in JavaScript has three states:

  • Pending β†’ Initial state before resolution or rejection.
  • Fulfilled (Resolved) β†’ Successfully completed, carrying a result.
  • Rejected β†’ Failed operation with an error reason.

Chaining Promises​

Correct Chaining​

Promises allow sequential execution by passing results to the next .then() handler.

new Promise(resolve => setTimeout(() => resolve(1), 1000))
.then(result => {
console.log(result); // 1
return result * 2;
})
.then(result => {
console.log(result); // 2
return result * 2;
})
.then(result => {
console.log(result); // 4
return result * 2;
});

Incorrect Chaining​

Each .then() operates on the same original promise without passing results forward.

let promise = new Promise(resolve => setTimeout(
() => resolve(1), 1000)
);

promise.then(result => { console.log(result); return result * 2 } ); // 1

// modified result value is not passed forward

Error Handling​

Promise handlers have an implicit try...catch, automatically catching thrown errors.

new Promise((resolve, reject) => {
throw new Error("Whoops!");
}).catch(alert); // Error: Whoops!

is same as:

new Promise((resolve, reject) => 
reject(new Error("Whoops!"))
).catch(alert); // Error: Whoops!

Handling Errors in Chained Promises​

Case 1: No Errors (Success Case)​

new Promise((resolve, reject) => {
resolve("Success!");
})
.then(result => {
console.log(result); // Output: Success!
return "Continuing execution";
})
.then(msg => {
console.log(msg); // Output: Continuing execution
})
.catch(error => {
console.error("Error caught:", error); // Never executes
});
  • The first promise resolves successfully with "Success!".
  • The first .then() receives this value and logs "Success!".
  • The second .then() continues execution and logs "Continuing execution".
  • The .catch() never executes because there’s no error.

Case 2: Error Occurs (Handled by .catch())​

If an error occurs at any stage of a promise chain, .catch() captures it. The execution resumes after .catch() with the next .then(), allowing for graceful recovery.

The execution of .then(), .catch(), and .finally() follows the order in which they are defined.

  • If an error occurs, it skips the remaining .then() blocks until a .catch() is found.
  • A re-thrown error continues down the chain until another .catch() handles it.
  • .finally() always runs, regardless of success or failure.
  • .finally() does not affect the promise chain's result.
new Promise((resolve, reject) => {
console.log("Step 1: Starting...");
resolve("βœ… Step 1 Complete");
})
.then(result => {
console.log(result); // Output: βœ… Step 1 Complete
console.log("Step 2: Proceeding...");
return "βœ… Step 2 Complete";
})
.then(result => {
console.log(result); // Output: βœ… Step 2 Complete

console.log("Step 3: Might fail...");
throw new Error("πŸ”₯ Step 3 Failure");
})
.catch(error => {
console.error("🚫 Caught an error in Step 3:", error.message); // error.message = "πŸ”₯ Step 3 Failure"

console.log("Handling error, but continuing...");
return "βœ… Error handled at Step 3";
})
.catch(error => {
// This will be **SKIPPED** because the previous `.catch()` handled the error
console.error("Second Catch Block: Won't run!");
})
.then(result => {
console.log(result); // Output: βœ… Error handled at Step 3

console.log("Step 4: Another risky operation...");
throw new Error("πŸ’₯ Step 4 Error");
})
.catch(error => {
console.error("🚫 Caught another error in Step 4:", error.message); // error.message = "πŸ’₯ Step 4 Error"

console.log("❌ Re-throwing the error...");
throw error; // Re-throwing β†’ Next `.catch()` will execute.
})
.catch(error => {
console.error("🚨 Second Catch Block (After Re-Throw):", error.message); // error.message = "πŸ’₯ Step 4 Error"

return "βœ… Error handled at Step 4";
})
.finally(() => {
console.log("Cleanup in Finally: This executes no matter what.");

return "This value is IGNORED";
})
.then(result => {
console.log(result); // Output: βœ… Error at Step 4 (NOT "This value is IGNORED")
console.log("πŸŽ‰ All done!"); // Output: πŸŽ‰ All done!
});

Promise.all vs Promise.race vs Promise.any​

  • Promise.all (Wait for all, fail if any fails) – Resolves when all succeed, but fails immediately if any reject.
  • Promise.race (First to settle wins) – Resolves or rejects with the first settled promise, whether success or failure.
  • Promise.any (First success wins, failures ignored) – Resolves with the first successful promise, ignoring rejections.
  • Promise.allSettled (Wait for all, never rejects) – Resolves with the results of all, whether fulfilled or rejected.
Example Code
const p1_1s = new Promise(resolve => 
setTimeout(() => resolve(1), 1000)); // Resolves in 1s

const p2_2s_Error = new Promise((_, reject) =>
setTimeout(() => reject(new Error("Whoops!")), 2000)); // Rejects in 2s

const p3_3s = new Promise(resolve =>
setTimeout(() => resolve(3), 3000)); // Resolves in 3s

const p4_4s = new Promise(resolve =>
setTimeout(() => resolve(4), 4000)); // Resolves in 4s


// Promise.all - Waits for all to resolve
Promise.all([p1_1s, p3_3s, p4_4s])
.then(console.log)
.catch(console.error);
// Output after 4s: [1, 3, 4] (All resolved)

// Promise.all - Fails early if any reject
Promise.all([p1_1s, p2_2s_Error, p3_3s])
.then(console.log)
.catch(console.error);
// Output after 2s: Error: Whoops! (Fails early)


// Promise.race - First to settle (resolve or reject)
Promise.race([p1_1s, p3_3s, p4_4s, p2_2s_Error])
.then(console.log)
.catch(console.error);
// Output after 1s: 1 (Fastest promise wins)

// Promise.race - First to reject
Promise.race([p3_3s, p4_4s, p2_2s_Error])
.then(console.log)
.catch(console.error);
// Output after 2s: Error: Whoops! (First rejection wins)


// Promise.any - First successful promise (ignores failures)
Promise.any([p2_2s_Error, p3_3s, p4_4s])
.then(console.log)
.catch(console.error);
// Output after 3s: 3 (First success wins, failures ignored)


// Promise.allSettled - Waits for all, never rejects
Promise.allSettled([p1_1s, p2_2s_Error, p3_3s, p4_4s])
.then(console.log);
/* Output after 4s:
[
{ status: 'fulfilled', value: 1 },
{ status: 'rejected', reason: Error: Whoops! },
{ status: 'fulfilled', value: 3 },
{ status: 'fulfilled', value: 4 }
]
*/

Promise.all(promises) - All or Nothing​

  • Waits for all promises to resolve.
  • If any fail, rejects immediately.
Promise.all([
new Promise(resolve => setTimeout(() => resolve(1), 1000)),
new Promise(resolve => setTimeout(() => resolve(2), 2000)),
new Promise(resolve => setTimeout(() => resolve(3), 3000))
])
.then(results => JSON.stringify(results, null, 2))
.then(console.log);

// Results array
[
1,
2,
3
]

Promise.allSettled(promises) - Waits for All​

  • Resolves with an array of objects detailing the outcome of each promise.
Promise.allSettled([
new Promise(resolve => setTimeout(() => resolve(1), 1000)),
new Promise((_, reject) => setTimeout(() => reject("Error!"), 2000)),
])
.then(results => JSON.stringify(results, null, 2))
.then(console.log)

// Results array
[
{
"status": "fulfilled",
"value": 1
},
{
"status": "rejected",
"reason": "Error!"
}
]

Promise.race(promises) - First to Settle​

  • Resolves or rejects based on the first settled promise.
Promise.race([
new Promise(resolve => setTimeout(() => resolve(1), 1000)),
new Promise((_, reject) => setTimeout(() => reject("Whoops!"), 500))
]).then(console.log).catch(console.log);

// Simply call console. No Results array
Whoops!

Promise.any(promises) - First Success Wins​

  • Resolves with the first successful promise.
  • If all fail, rejects with an AggregateError.
Promise.any([
new Promise((_, reject) => setTimeout(() => reject("Fail 1"), 1000)),
new Promise(resolve => setTimeout(() => resolve(2), 2000)),
new Promise(resolve => setTimeout(() => resolve(3), 3000))
]).then(console.log); // 2